SupportBee offers native email integration with Gmail/Google Workspace and Microsoft Outlook/Office 365. For other email providers, you can connect using email forwarding combined with SMTP setup for sending replies.
Gmail/Google Workspace
The native Gmail integration connects your inbox directly to SupportBee using OAuth. This is the recommended approach for all Gmail and Google Workspace accounts - it is more reliable than SMTP and handles authentication automatically.
Setting up Gmail
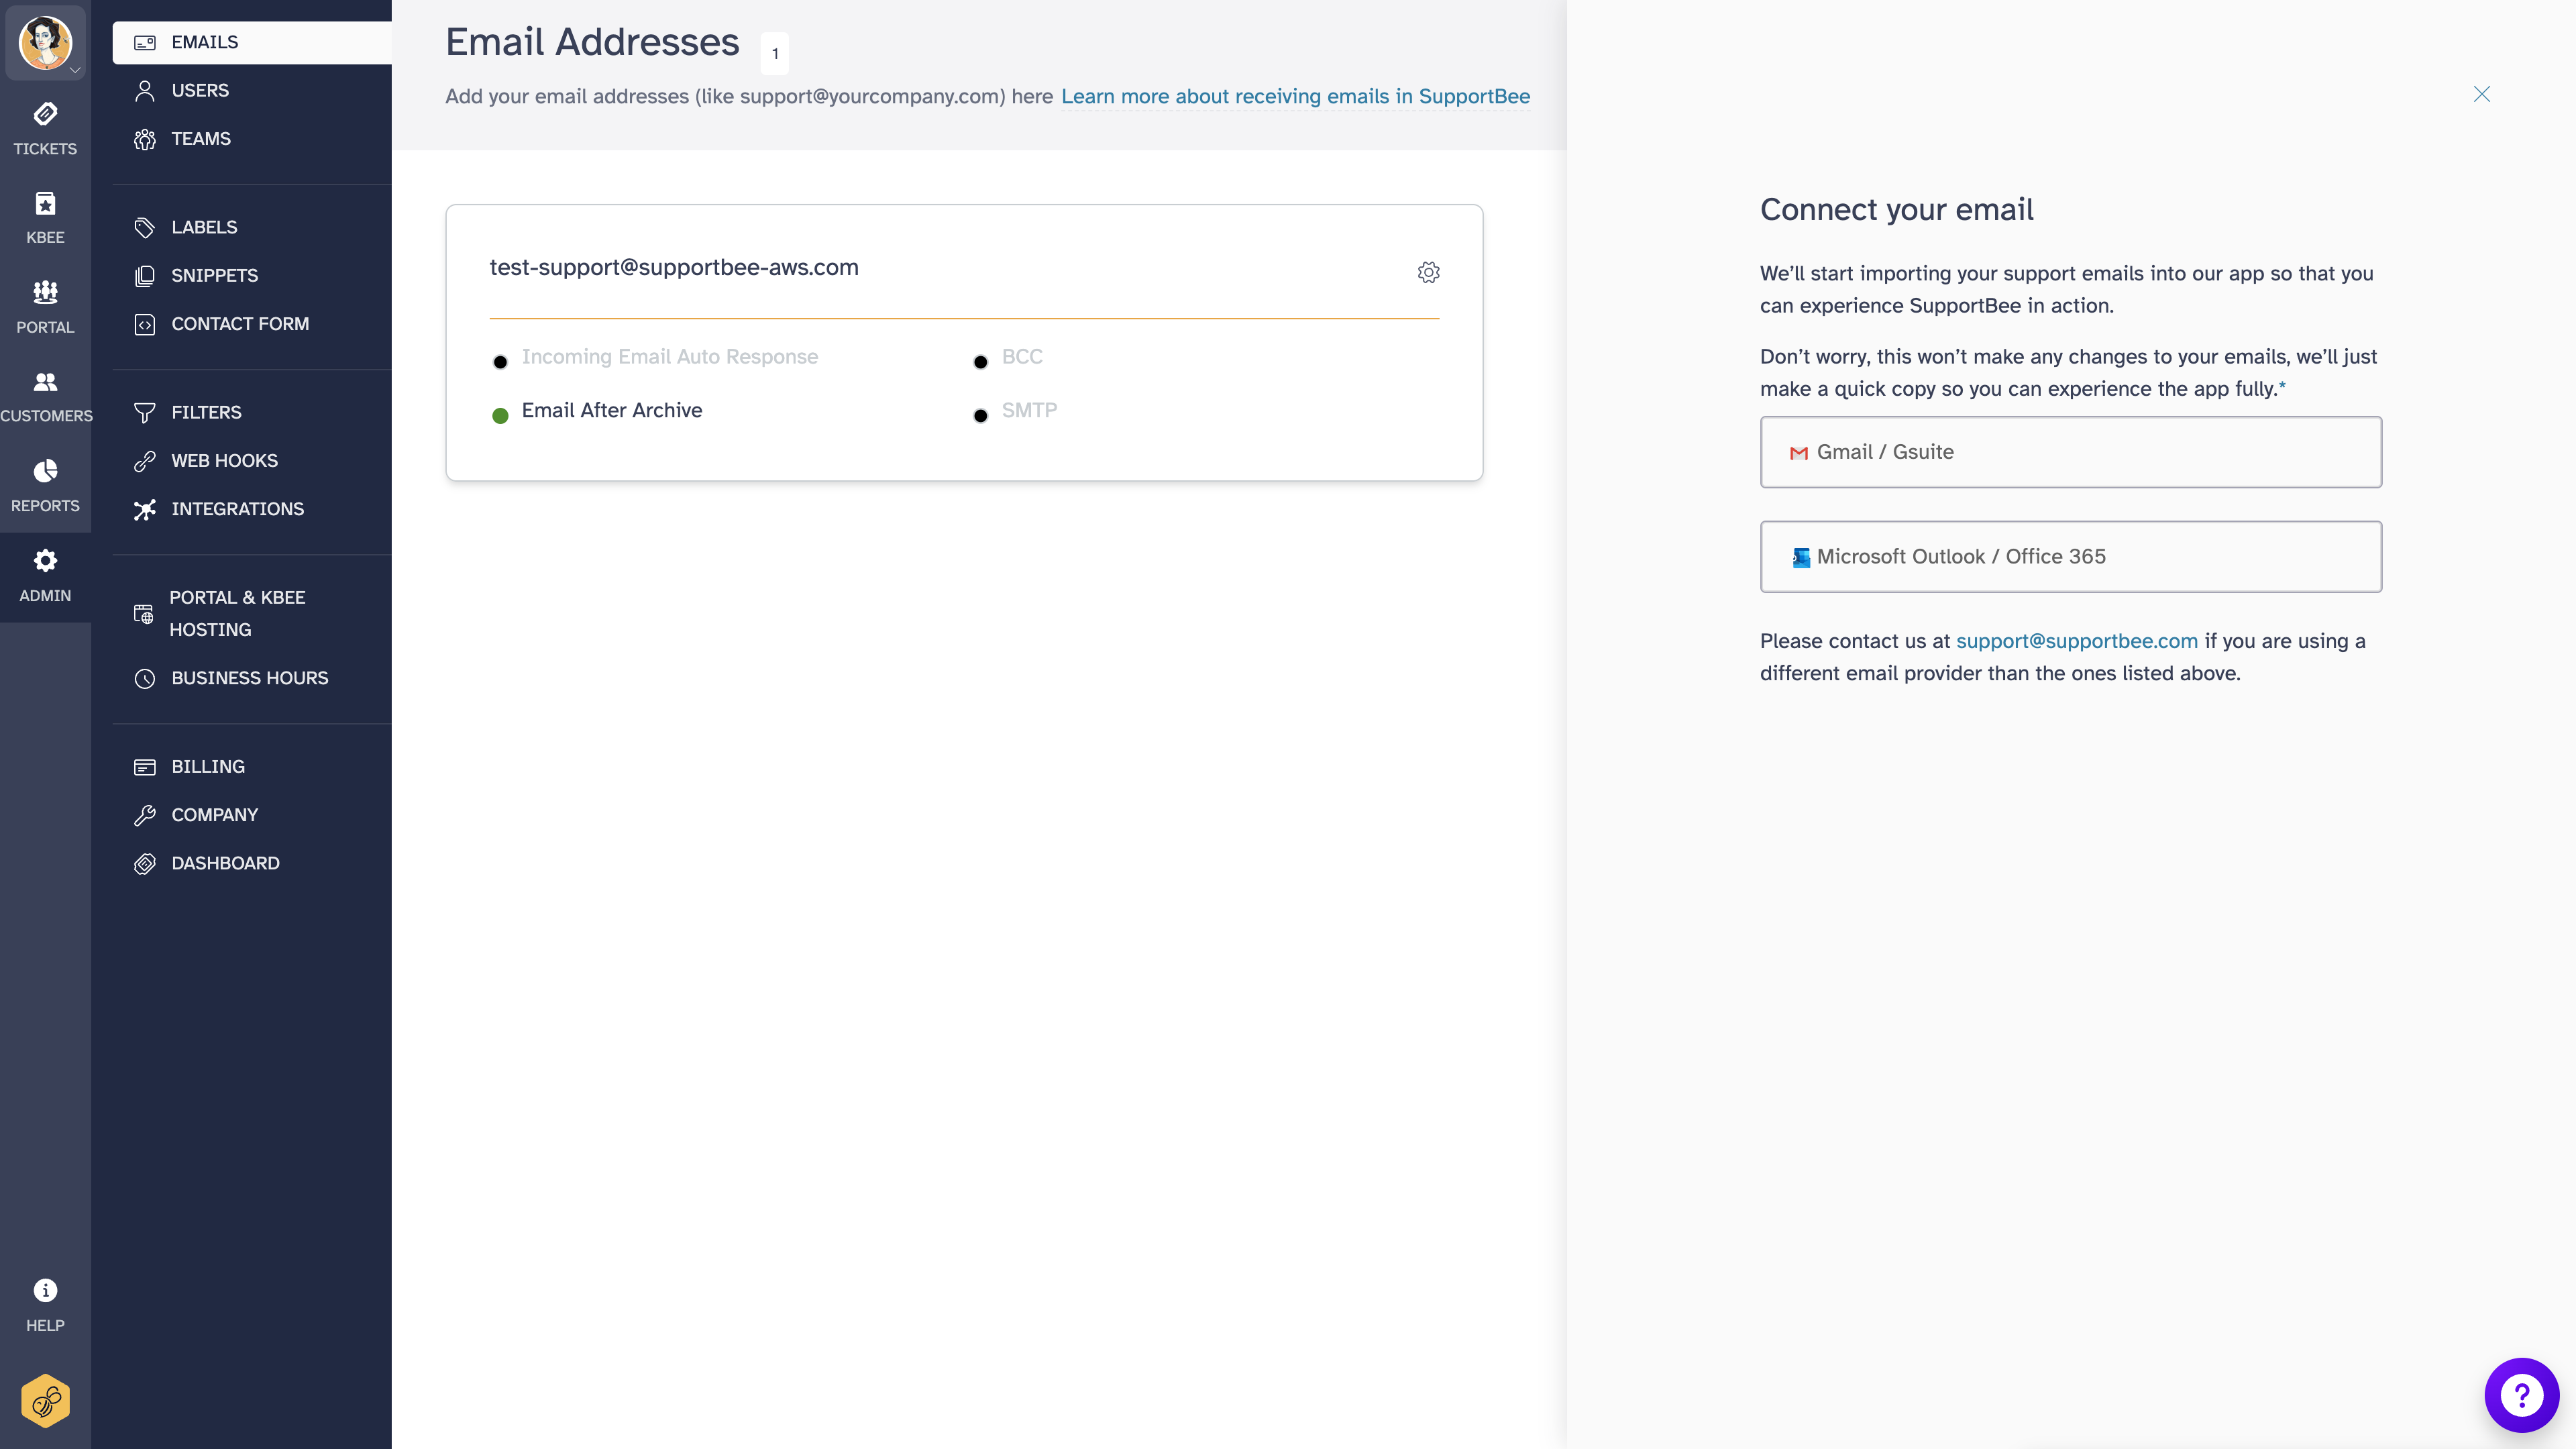
- Select Admin > Email from the left-hand-side navigation
- Click on + Email Address
- Choose Gmail/Google Workspace
- Sign in with your Google account when prompted
- Choose the email address from which you wish to receive emails in SupportBee
- Select all permissions and click Allow to permit SupportBee to access your emails
The email address has now been added under Admin > Emails. Any email sent to the added email address will be automatically available in SupportBee.
Gmail troubleshooting
Outbound emails not reaching customers - If you can receive tickets but your replies are not being delivered, check that your Google Workspace account has sending enabled and that your domain's SPF, DKIM, and DMARC records are correctly configured. See our email deliverability guide for details.
Legacy integration vs native integration - If your Gmail account was connected before SupportBee introduced the native Gmail integration, you may be using a legacy forwarding setup with a separate SMTP configuration. We recommend removing the old setup and reconnecting using the native integration above - it handles both sending and receiving in a single connection.
Google Groups addresses - Google Groups email addresses can be connected to SupportBee, but they must be set up as a collaborative inbox in Google Workspace first. Connect the group address the same way you would a regular Gmail address.
Microsoft Outlook/Office 365
The native Outlook integration connects your inbox using Microsoft's OAuth authentication. This is the recommended approach for all Outlook and Office 365 accounts.
Setting up Outlook
- Select Admin > Email from the left-hand-side navigation
- Click on + Email Address
- Choose Microsoft Outlook / Office 365
- Sign in with your Microsoft account when prompted
- Choose an email account or add one from which you would like to receive emails
- Grant SupportBee the requested permissions
When you are done, your address will be available under Admin > Emails in SupportBee. Any email sent to that address will be automatically available as tickets.
Outlook troubleshooting
Admin permissions error - If you see an error about admin permissions during setup, your Office 365 administrator may need to approve third-party app access for your organization. Ask your IT administrator to allow SupportBee in the Azure AD app consent settings, or have an admin complete the initial connection.
Reconnection errors - If your Outlook connection drops and the reconnection link leads to an error page, try reconnecting from Admin > Email instead. Click the email address that shows as disconnected and follow the authentication steps again. If the issue persists, try reconnecting in an incognito browser window to rule out cached session problems.
Continuous disconnections - If your Outlook account keeps disconnecting, check that your Office 365 account is active and in good standing. Conditional access policies in Azure AD can also block third-party connections - ask your IT administrator to verify SupportBee is allowed.
Migrating from Google Workspace to Microsoft 365 - If you are switching email providers, remove your old Gmail connection in SupportBee and add your new Outlook address. There is no automated migration between providers - you will need to set up the new connection fresh.
Other email providers
For email providers other than Gmail and Outlook (such as Zoho Mail, cPanel-hosted email, Yahoo, or other hosts), SupportBee does not offer a native integration. You can still connect these providers using a two-step process:
- Set up email forwarding in your email provider to forward incoming emails to your SupportBee forwarding address (found under Admin > Email)
- Configure SMTP so that SupportBee can send replies from your email address. See our SMTP setup guide for instructions
This approach works with any email provider that supports forwarding and provides SMTP access. Note that SMTP connections can be less stable than native integrations - if reliability is critical, consider using a Gmail or Outlook address for your support inbox.
For a full list of supported connection methods, see supported email providers.
Reconnecting a disconnected email
SupportBee will send you a notification email if your email connection is interrupted. This can happen when your email password changes, when your provider revokes access tokens, or due to temporary provider outages.
To reconnect:
- Go to Admin > Email
- Find the email address marked as disconnected
- Click on the email address and follow the authentication steps to reconnect
After updating your email password - If you changed your Gmail or Outlook password, SupportBee's connection may break. Reconnect using the steps above. You will be prompted to sign in with your new credentials.
Disconnection notification emails - SupportBee sends these from [email protected]. They are legitimate and indicate that your email connection needs attention. If you are still receiving tickets normally, the disconnection may have resolved itself - but it is worth checking your connection status under Admin > Email to confirm.
Checking connection status - Under Admin > Email, each email address shows its current status. A green indicator means the connection is active. If an address shows as disconnected, follow the reconnection steps above.
Adding multiple email addresses
SupportBee supports unlimited email inboxes on all plans. You can connect as many email addresses as you need - one for each brand, department, product, or region your team supports. Simply repeat the setup steps above for each email address you want to connect.
Each email address can have its own auto-responder and signature, so replies from each address carry the appropriate branding. The receiving email address is displayed on each ticket, so agents can see which inbox the customer contacted.
Automatically routing tickets
You can automatically assign tickets to agents or teams, or add labels based on the email address, subject, body, etc. using filters. For example, tickets to [email protected] can be auto-assigned to your finance team, while tickets to [email protected] get a "support" label.
Reply name settings
You can configure what name shows up as the sender when you reply from SupportBee. Click on the gear icon next to an email address under Admin > Email and choose Settings.
Under the section Reply Name, you can choose whether the agent's name or your company's name shows as the sender.
Forwarding emails from a personal account
Customers may occasionally email one of your agents at their personal address. In this case, the agent can forward these emails to SupportBee, and we will create a ticket on behalf of the customer. However, this will only work if:
- The Fwd: Subject format is in English
- The body of the email contains the customer's email address as 'From: [email protected]' (Outlook/Gmail mobile do not have this)
- The email is forwarded from an email address registered as a user with SupportBee
If any of these requirements is missing, we will generate a comment on the ticket with the error. You can manually change the requester's address by clicking the address listed below the customer name in the ticket's interface.
Missing emails
If emails sent to your support address are not appearing as tickets in SupportBee, check the following:
- Connection status - Verify your email address is connected and not showing as disconnected under Admin > Email
- Spam filtering - The email may have been caught by SupportBee's spam filter. Check your spam folder in SupportBee
- Email forwarding - If you are using forwarding rather than a native integration, verify that your forwarding rules are still active in your email provider
- Provider-side filtering - Your email provider may be filtering or blocking emails before they reach SupportBee. Check your provider's spam and filtering settings
If the problem persists after checking these, contact SupportBee support with the email address affected and the approximate time the missing email was sent.
Migrating from a shared inbox?
If you're currently using a Gmail shared inbox or Google Workspace shared mailbox, SupportBee's email ticketing system offers a more powerful alternative with collision detection, ticket assignment, and team collaboration features.