How to Create a Shared Mailbox in Google Workspace
Google Workspace has no native shared mailbox. Here are 3 ways to create one -- Gmail delegation, Collaborative Inbox, and shared inbox tools.

Google Workspace does not have a native shared mailbox feature. There is no button to click. There is no setting to toggle. Unlike Microsoft 365, Google never built one.
But you can still create a shared mailbox in Google Workspace. You have three options: Gmail delegation, Google Groups Collaborative Inbox, or a third-party shared inbox tool. Each works differently.
This guide walks you through all three options with step-by-step setup instructions.
Quick Comparison of All Three Methods
Here is how the three options compare side by side.
| Gmail Delegation | Google Groups Collaborative Inbox | Third-Party Shared Inbox Tool | |
|---|---|---|---|
| Best for | 1-2 people helping manage one inbox | Teams sharing a common email address | Growing teams that need full collaboration features |
| Email address | Uses existing Gmail address | Creates new group email (e.g., [email protected]) | Connects to your existing Google Workspace email |
| Max users | Up to 1,000 delegates | Unlimited | Unlimited |
| Assignment tracking | No | Yes (basic) | Yes (advanced, with auto-assignment) |
| Collision detection | No | No | Yes |
| Internal notes | No | No | Yes |
| Analytics & reporting | No | No | Yes (response times, workload, volume) |
| Automation | No | No | Yes (filters, auto-responses, routing) |
| Conversation status | No | Yes (complete, duplicate, no action needed) | Yes (fully customizable workflows) |
| Setup complexity | Very easy | Moderate | Easy (connects in minutes) |
| Cost | Free with Google Workspace | Free with Google Workspace | Starts at $17/user/month |
Pick Gmail Delegation if:
- You need a backup person to manage your personal inbox
- Only 1-2 people need access
Pick Google Groups Collaborative Inbox if:
- Your team needs a shared address like support@ or sales@
- A small team will respond to emails
- You only need basic assignment and status tracking
Pick a Third-Party Tool if:
- More than 3-5 people handle emails
- You need to see who is replying, leave internal notes, or track metrics
- You want auto-assignment, canned replies, or routing rules
- Google Groups feels too limited
Method 1: Gmail Delegation
Gmail delegation gives another person access to your inbox. They can read, send, and delete emails on your behalf. They do not need your password.
This works well when an assistant covers your inbox. It does not create a new email address. It shares your existing one. For the full delegate setup walkthrough including limits, the "sent by" footer behaviour, and common pitfalls, see our dedicated guide on how to delegate Gmail access.

How to Set Up Gmail Delegation
Step 1: Open Gmail. Click the gear icon. Click "See all settings."
Step 2: Go to the "Accounts and Import" tab.
Step 3: Find "Grant access to your account." Click "Add another account."
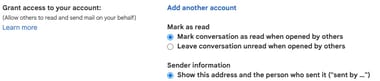
Step 4: Type the email of the person you want to give access to.
Step 5: Click "Next step" and confirm.
The person you added gets an email to accept. Access can take up to 24 hours to go live.
Delegation Limits
| Account Type | Max Delegates |
|---|---|
| Google Workspace | 1,000 users |
| Personal Gmail | 10 users |
| Safe number at once | About 40 (more may lag) |
Google says you can add up to 1,000 delegates. But if more than 40 use the inbox at the same time, things slow down.
What Delegates Can Do
- Read all emails
- Send emails (the recipient sees "sent by [delegate name]")
- Delete and archive emails
- Use labels and filters
- Search the inbox
What Delegates Cannot Do
- Change the password or account settings
- Use Google Chat or Meet from that account
- Give access to other people
- Use the inbox on a phone or tablet
That last point trips up many teams. Delegation only works on desktop. If your team needs mobile access, use Google Groups or a shared inbox tool instead.
Method 2: Google Groups Collaborative Inbox
A Collaborative Inbox creates a shared email address like [email protected]. Your whole team can read and reply to messages sent to that address.
Unlike delegation, this creates a brand-new shared address. Anyone on the web can email it, and your team manages replies in one place.
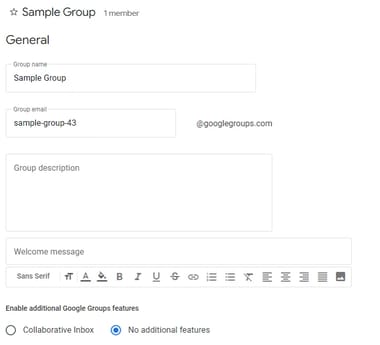
Step 1: Create a Google Group
Go to Google Groups and sign in with your Google Workspace account.
Click + Create group and fill in:
- Group name: e.g., "Customer Support"
- Group email: e.g., [email protected]
- Description: What this group is for
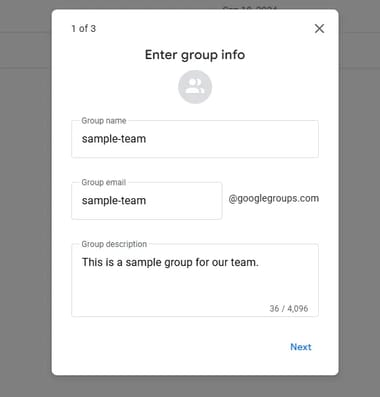
Click Next.
Step 2: Set Privacy Settings
Pick who can see, join, and post to the group.
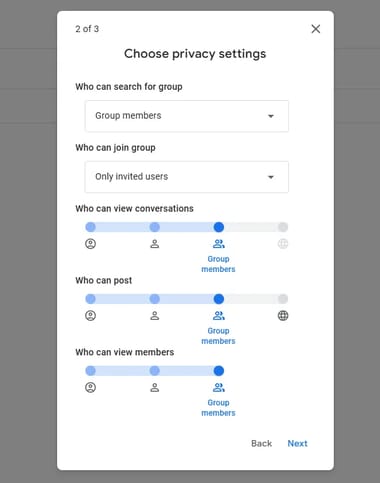
For a support inbox, use these settings:
- Who can join: Only invited users
- Who can post: Anyone on the web (so customers can email you)
- Who can view conversations: All group members
Click Next.
Step 3: Add Team Members
Type the email addresses of people who need access.
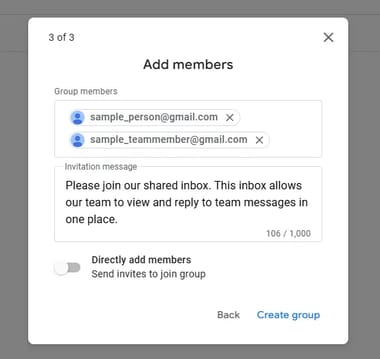
You can add members right away or send invites. Direct adds get instant access. Invites require the person to accept first.
Click Create group.
Step 4: Turn On Collaborative Inbox
After you create the group:
- Open Group settings in the left sidebar
-
Under General, find "Enable additional Google Groups features"
-
Select Collaborative Inbox
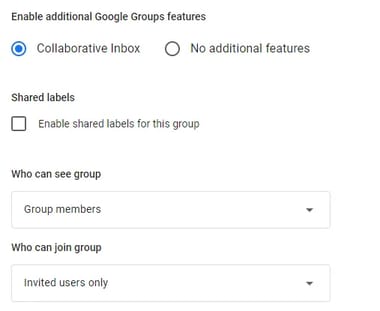
- Click Save changes
What You Can Do With Collaborative Inbox
Your team can now:
| Feature | How It Works |
|---|---|
| Assign emails | Claim an email or give it to a teammate |
| Mark status | Set as Complete, Duplicate, or No Action Needed |
| Filter by owner | See only your assigned emails |
| Filter by status | See only open or done emails |
Common Problems With Collaborative Inbox
Many teams hit these walls as they grow:
- No collision detection. Two people can reply to the same email. Neither knows the other is typing.
- No internal notes. You cannot discuss an email with your team before replying. You have to forward it or hop into Slack.
- Slow interface. Google Groups was built for mailing lists. It feels clunky for daily support work.
- Weak mobile support. Managing a Collaborative Inbox on a phone is awkward at best.
- No reporting. You cannot track response times, email volume, or team workload.
If these problems slow your team down, a purpose-built tool is the next step.
Shared Mailbox vs Distribution List
Many people confuse these two. They serve very different purposes in Google Workspace.
A distribution list sends one email to many people. Each person gets a copy in their own inbox. They reply on their own. Nobody can see what others said.
A shared mailbox lets a team manage one inbox together. Everyone sees the same emails. You can assign messages, track status, and avoid sending the same reply twice.
| Feature | Distribution List | Shared Mailbox |
|---|---|---|
| Purpose | Send emails to a group | Manage emails as a team |
| Where replies go | Each person's own inbox | One shared inbox |
| Can others see replies? | No | Yes |
| Assignment | Not possible | Assign to team members |
| Status tracking | Not possible | Mark as done, duplicate, etc. |
| Best for | Announcements, newsletters | Support, sales, shared team emails |
Use a distribution list to broadcast news. Think team updates or company memos.
Use a shared mailbox when a team needs to reply to customers. Think support@, sales@, or billing@ addresses.
In Google Workspace, both run on Google Groups. The difference is one setting. Turn on Collaborative Inbox, and your distribution list becomes a basic shared mailbox.
Method 3: Third-Party Shared Inbox Tools
Gmail delegation and Collaborative Inbox are free. But they were built for simple cases. Once your team handles more than a few emails a day, the gaps show up fast.
Third-party tools connect to your Google Workspace account. They add features that Google left out.
Why Teams Move Past Google's Built-In Options
As email volume grows, these problems get worse:
- Duplicate replies. Two agents reply to the same email. The customer gets two answers.
- Lost context. You cannot leave notes on an email. So you forward it or ask in Slack. Context gets scattered.
- No data. You cannot measure response times or see who is overloaded.
- No automation. You cannot auto-assign emails or create canned replies.
- Clunky workflow. Google Groups was made for mailing lists. Using it for support is a poor fit.
What Third-Party Tools Add
| Feature | Gmail Delegation | Google Groups | Shared Inbox Tool |
|---|---|---|---|
| Collision detection | No | No | Yes |
| Internal notes & comments | No | No | Yes |
| Response time tracking | No | No | Yes |
| Canned responses | No | No | Yes |
| Auto-assignment rules | No | No | Yes |
| Customer history | No | Limited | Full |
| Knowledge base | No | No | Often included |
| Customer portal | No | No | Often included |
Popular Tools for Google Workspace
| Tool | Starting Price | Best For |
|---|---|---|
| SupportBee | $17/user/month | Teams that want a simple, powerful shared inbox |
| Hiver | $19/user/month | Teams that want to stay inside Gmail |
| Front | $19/user/month | Teams with multiple channels |
| Help Scout | $22/user/month | Teams that need a full help desk |
SupportBee: Built for Google Workspace Teams
SupportBee connects to your Google Workspace email in minutes. It adds what Gmail delegation and Google Groups leave out:
- Collision detection -- See when a teammate views or replies to an email. No more duplicate answers.
- Internal notes -- Discuss an email with your team before you reply. No forwarding needed.
- Assignments -- Assign emails to agents or teams. See what is open, answered, or archived.
- Canned responses -- Save common replies. Add dynamic fields to make them personal. You can also create email templates in Gmail natively, but SupportBee's snippets are shared across your whole team.
- Reports -- Track first response times, email volume, and team workload.
- Knowledge base -- Build a help center so customers find answers on their own.
- Customer portal -- Let customers track their requests in one place.
Pricing: Starts at $17/user/month.
Start your free 14-day trial -- no credit card required.
Frequently Asked Questions
What is a shared mailbox in Google Workspace?
A shared mailbox lets several people read and reply to one email address. Google Workspace does not have a native shared mailbox feature. You use Gmail delegation or Google Groups Collaborative Inbox to get a similar result.
What is the difference between a shared inbox and a shared mailbox?
They mean the same thing. "Shared mailbox" is common in Microsoft 365. "Shared inbox" is common in Gmail and Google Workspace. Both refer to one email account managed by a team.
What is the difference between a shared mailbox and a Google Group?
A Google Group is a mailing list. One email goes to every member. A shared mailbox (Collaborative Inbox) lets members view, assign, and reply to emails in one place. You create one by turning on Collaborative Inbox in a Google Group.
Does Gmail allow a shared mailbox?
Not exactly. Gmail has delegation, which gives someone else access to your inbox. But it does not create a true shared mailbox. For team-based email management, use Google Groups Collaborative Inbox or a shared inbox tool.
How many people can access a shared mailbox in Google Workspace?
- Gmail delegation: Up to 1,000 delegates. Google says keep it under 40 at once.
- Google Groups: No member limit.
Is Google Workspace free?
No. Plans start at $7/user/month for Business Starter. Personal Gmail is free but limits delegation to 10 users. Schools may get free access through Google Workspace for Education.
Can I use a shared mailbox with my current email address?
With delegation: Yes. Delegates use your existing Gmail address.
With Google Groups: No. You create a new group address. But you can forward emails from your old address to the group. If you just need to view multiple Gmail accounts in one inbox, forwarding or account linking may be simpler than creating a group.
How do I know if someone is already replying to an email?
Google Groups does not show this. There is no live indicator.
Workaround: Assign the email to yourself before replying. But teammates will not see it until they refresh.
Better option: Use a tool like SupportBee that shows live collision detection.
Can external people email my Google Groups address?
Yes. Go to Group settings, then Posting policies. Set "Who can post" to "Anyone on the web." Now customers can email your [email protected] address.
What about Gmail contact groups?
Gmail contact groups let you email several people at once. This is handy for announcements. But it is not a shared mailbox. Others cannot see or manage emails you send and receive. For team email management, use one of the three methods in this guide.