Office 365 Shared Mailbox: Setup Guide and Best Practices
Learn 10 shared mailbox best practices for Office 365 and Outlook. Boost team collaboration, security, and response times.
A shared mailbox in Office 365 lets multiple users read and send emails from one address without needing a separate license. It works well for customer support, sales inquiries, and internal coordination. But without clear rules, shared mailboxes turn into chaos fast. Emails get missed. Two agents reply to the same customer. Nobody knows who owns what.
These 10 shared mailbox best practices will help your team stay organized, respond faster, and avoid common pitfalls. We also cover setup steps, shared mailbox etiquette, and email assignment workflows for Outlook.
What Is an Office 365 Shared Mailbox?
A shared mailbox in Office 365 gives your team a central email address that multiple people can access. Think [email protected] or [email protected]. If you are still choosing between Microsoft and Google, see our Google Docs vs Office 365 comparison for a full breakdown.
The mailbox doesn't need a separate license as long as it stays under 50 GB. Team members add the shared mailbox in Outlook and open it alongside their personal mailbox. Everyone can read incoming emails, reply, and organize messages from the same account.
Benefits of Using a Shared Mailbox
-
Centralized communication: All emails land in one place. No messages slip through the cracks.
-
Collaborative response: Multiple team members can reply, which speeds up response times and allows smooth handoffs.
-
Cost-effective: Shared mailboxes do not need extra licenses. You save money while gaining essential features.
-
Shared calendar: Each shared mailbox includes a calendar for team scheduling, deadlines, and meetings - pair it with the Scheduling Assistant in Outlook to find times that work across the team.
10 Shared Mailbox Best Practices for Office 365
Follow these shared mailbox management best practices to keep your team productive and your customers happy.
1. Define Clear Ownership Rules
Every email that arrives in a shared mailbox needs an owner. Without ownership rules, emails sit unread or get duplicate replies. Set a clear policy for who handles what.
Start by assigning responsibility based on topic, customer type, or time of day. For example, billing questions go to your finance team. Technical issues go to support engineers. New sales inquiries go to the on-call sales rep.
Write these rules down. Share them with every team member who has access. Review them each quarter to keep them current. If you use categories or folders in Outlook, match them to your ownership rules so emails land where the right person will see them.
2. Use Categories and Flags to Track Status
Outlook categories and flags turn a messy inbox into a visual workflow. Create a standard set of categories that every team member uses the same way.
A simple system works best:
- Needs Response - nobody has replied yet
- In Progress - someone is working on it
- Waiting on Customer - you replied and need more info
- Resolved - done, ready to archive
Pair categories with follow-up flags. Flag emails that need action by a specific date. This keeps urgent items visible and prevents emails from getting buried under new messages. To make sure flagged emails resurface at the right time, set Outlook reminders with a custom date and time.
The key is consistency. If each team member invents their own system, the categories become meaningless. Document your category definitions and train every new team member.
3. Set Up Mailbox Rules and Automation
how to organize gmail save time by sorting emails before anyone touches them. In Outlook, you can route messages to folders based on sender, subject line keywords, or other criteria.
For example, create a rule that moves all emails with "invoice" in the subject to a Billing folder. Route messages from VIP customers to a Priority folder. Flag emails from your CRM system for immediate follow-up.
Go further with Microsoft Power Automate. Build workflows that notify your team in Microsoft Teams when a high-priority email arrives. Auto-assign emails based on keywords. Send reminders when an email stays unread for more than two hours. See our guide on Power Automate workflows for customer support emails for detailed setup instructions.
Automation reduces manual sorting and helps your team focus on replying instead of organizing.
4. Establish Shared Mailbox Etiquette
Shared mailbox etiquette is the set of norms your team follows to avoid confusion. Without etiquette rules, two agents may reply to the same email. One agent might delete something another agent needs.
Set these ground rules:
- Claim before you reply. Before writing a response, assign the email to yourself using a category or flag. This signals to the rest of the team that you have it handled.
- Never delete shared emails. Archive instead. Other team members may need the conversation history.
- Use internal notes, not reply-all. When you need input from a colleague, don't reply to the customer by accident. Use a separate channel or a tool that supports resolving customer complaints.
- Sign your replies. Even though the email goes out from the shared address, add your name in the signature. Customers appreciate knowing who they are talking to.
- Keep drafts short-lived. If you start a draft, finish and send it within the hour. Stale drafts block other agents from replying.
Write these norms into a shared document. Review them during onboarding for every new team member.
5. Audit Permissions Regularly
Permissions control who sees and sends from your shared mailbox. Stale permissions create security risks. A former employee with access can still read sensitive emails.
Run a permissions audit every quarter. Remove access for team members who have left or changed roles. Check that each person has the right permission level:
- Full Access - can open and read all emails
- Send As - can send emails that appear to come from the shared address
- Send on Behalf - can send emails that show their name on behalf of the shared address
Most customer-facing teams use Send As to maintain a consistent brand voice. Use Send on Behalf when transparency about the individual sender matters.
Manage permissions through the Microsoft 365 admin center or PowerShell. For large teams, PowerShell scripts make bulk changes faster.
6. Build an Email Assignment Workflow
An email assignment workflow defines how incoming messages get routed to the right person. This matters most for teams with five or more agents sharing one mailbox.
Here are three common workflow patterns for Outlook shared mailboxes:
Round-robin: Each new email goes to the next person in rotation. This spreads the load evenly. You can set this up manually with a rotation schedule or automate it with Power Automate.
Skills-based: Route emails based on topic. Billing questions go to your finance person. Technical issues go to an engineer. Use mailbox rules to sort emails into topic folders. Then assign each folder to a specific agent.
Queue-based: All emails land in a single queue. Agents pull the next unassigned email when they finish their current task. This works well for teams where everyone can handle any topic.
Pick the pattern that fits your team size and skill mix. Then document it so everyone follows the same process. If your volume grows beyond what Outlook rules can handle, consider a shared inbox tool that has built-in assignment features.
7. Monitor Mailbox Size and Performance
Shared mailboxes have a 50 GB storage limit. When you hit that cap, new emails bounce. This is a silent disaster for customer support.
Check your mailbox size monthly through the Microsoft 365 admin center. Set up an alert when the mailbox reaches 80% capacity. This gives your team time to clean up before emails start bouncing.
Reduce mailbox size by archiving old conversations. Move emails older than 90 days to an archive mailbox or export them. Delete junk and spam regularly, and block persistent unwanted senders in Outlook so they never reach the mailbox in the first place. Encourage your team to avoid storing large attachments in the shared mailbox. Instead, upload files to SharePoint or OneDrive and share links.
If your team outgrows the 50 GB limit, you can assign a license to the shared mailbox to expand storage. But this adds cost, so archiving is the better first step.
8. Create Canned Responses for Common Questions
Most shared mailboxes receive the same questions over and over. Canned responses (also called quick parts or templates in Outlook) let your team reply in seconds instead of typing the same answer from scratch. If you haven't set these up yet, see our step-by-step guide on how to set up Outlook email templates.
Build a library of templates for your top 10 most common questions. Include:
- Greeting and sign-off
- Step-by-step instructions for frequent requests
- Links to your knowledge base articles
- Escalation responses for issues that need a manager
Store templates in Outlook Quick Parts or a shared OneNote notebook. Review and update them every month. Stale templates with outdated info do more harm than good.
Canned responses also improve consistency. Every customer gets the same accurate answer, regardless of which team member replies.
9. Separate Internal and External Communication
Mixing internal chatter with customer emails clutters a shared mailbox. It slows down response times and increases the risk of sending an internal message to a customer.
Keep internal communication out of the shared mailbox. Use Microsoft Teams, Slack, or internal comments within your support tool for team discussions. If you must send an internal email, use a separate distribution list or group - see how to create a distribution list in Outlook.
For teams that handle both customer support and internal coordination from the same address, create separate folders or categories. Route internal emails to one folder and external emails to another. This keeps customer emails front and center.
10. Know When to Upgrade Beyond a Shared Mailbox
Shared mailboxes work well for small teams. But they have limits. As your team grows, you'll hit friction points that no amount of best practices can fix.
Watch for these signs:
- Duplicate replies happen more than once a week
- Emails sit unanswered for hours because nobody claims them
- You can't track response times or resolution rates
- Your team spends more time organizing the mailbox than replying to customers
- You need SLA tracking or customer satisfaction surveys
When you see these patterns, it's time to move to a dedicated tool. A shared inbox tool or help desk gives you built-in assignment, collision detection, and reporting. See our breakdown of the problems with using Outlook as a helpdesk to understand where shared mailboxes fall short.
Shared Email Inbox Workflow Design Patterns
Beyond the basic assignment workflows above, here are proven workflow patterns for teams that manage high volumes through a shared mailbox.
The Triage Model
One team member (the "triage agent") reviews every incoming email first. They do not reply. Instead, they assign each email to the right person, set the priority, and add context. This works well for teams of 5-15 where emails vary widely in topic and urgency.
The triage agent role can rotate daily or weekly. The benefit is speed. Emails reach the right person within minutes. The downside is that the triage agent does not handle their own queue during their shift.
The Tiered Response Model
Split your team into tiers. Tier 1 handles simple, common questions using canned responses. Tier 2 handles complex issues that need research or technical knowledge. Emails start in Tier 1. If the agent cannot resolve it within 15 minutes, they escalate to Tier 2.
Use Outlook categories to mark the tier level. Create a folder for each tier. This keeps the workflow visible to everyone. Tier 1 agents focus on speed. Tier 2 agents focus on depth.
The Follow-the-Sun Model
For distributed teams across time zones, divide mailbox coverage by shift. Morning team in Europe handles emails from 6 AM to 2 PM UTC. Afternoon team in North America picks up from 2 PM to 10 PM UTC. Night team in Asia covers the rest.
Use Outlook rules to flag emails that arrived during off-hours. Each shift starts by reviewing flagged items. Add a handoff note to any email that is in progress when your shift ends. This ensures continuity without gaps.
How to Create a Shared Mailbox in Office 365
If you haven't set up your shared mailbox yet, follow these steps. You need admin access to the Microsoft 365 admin center.
Step 1: Access the Microsoft 365 Admin Center
Log into your Office 365 account with an admin account. Go to https://admin.microsoft.com.
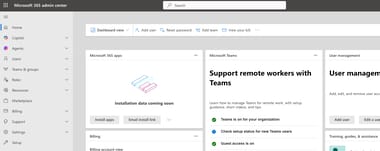
You'll see a dashboard with options for managing users, groups, licenses, and mailboxes.
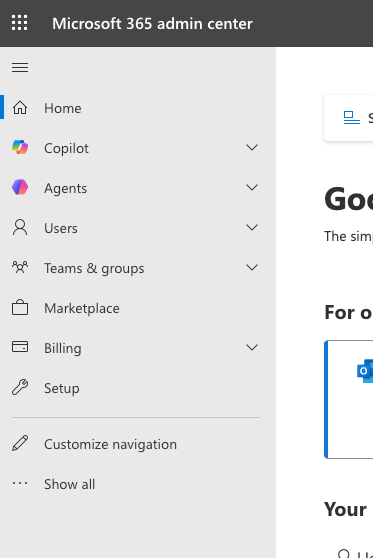
Step 2: Navigate to Shared Mailboxes
In the left sidebar, expand Teams & groups and click Shared mailboxes. This page lists all existing shared mailboxes and lets you create new ones.
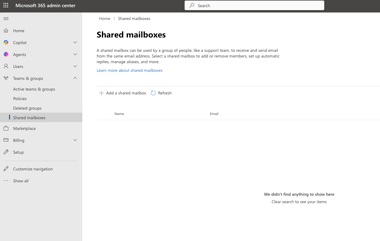
Step 3: Create the Shared Mailbox
Click Add a shared mailbox. Enter these details:
-
Mailbox name: The display name your team will see.
-
Email address: The address users will email, such as [email protected].
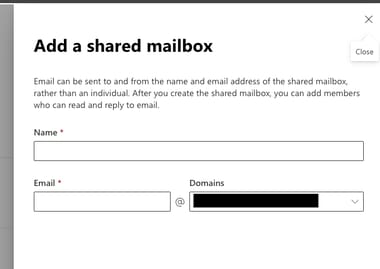
Click Create. The mailbox will be ready in a few moments.
Step 4: Assign Members
Click the mailbox name in the list. Select Edit under Members. Add the users who need access.
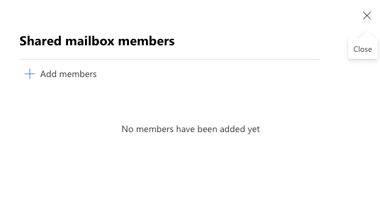
These users will be able to read and send emails from the shared address once permissions take effect.
Step 5: Configure Permissions
Members get Full Access and Send As permissions by default. Verify these settings match your needs:
-
Full Access: Open the shared mailbox and view all emails.
-
Send As: Send emails that appear to come from the shared address.
-
Send on Behalf: Send emails that show the sender's name on behalf of the shared address.
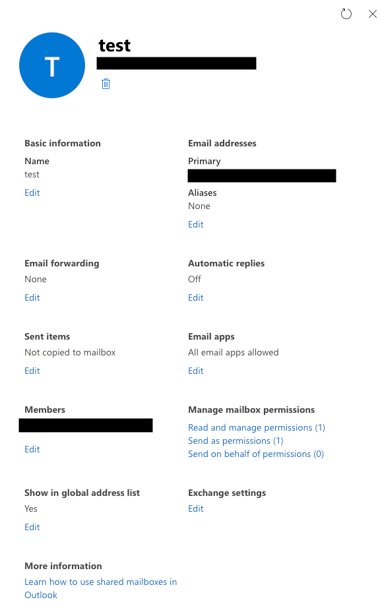
Manage permissions in the admin center or with PowerShell for bulk changes.
Accessing the Shared Mailbox
Once you set up permissions, your team needs to open the shared mailbox. Here's how.
Access via Outlook Desktop
The shared mailbox should appear in the Outlook folder pane after permissions are granted. If it doesn't show up, add it manually:
-
Go to File > Account Settings > Account Settings.
-
Select your account and click Change.
-
Click More Settings > Advanced tab.
-
Under Open these additional mailboxes, click Add and enter the shared mailbox name.
-
Click OK and restart Outlook.
Access via Outlook on the Web (OWA)
-
Log in to https://outlook.office.com.
-
Click your profile picture in the top-right corner.
-
Select Open another mailbox.
-
Enter the shared mailbox email address and click Open.
The shared mailbox opens in a new browser tab.
Sending Emails from a Shared Mailbox
Team members can send emails from the shared address. This keeps a consistent brand voice. Recipients see the team address, not individual names.
Sending from Outlook Desktop
When composing a new email, select the From field and choose the shared mailbox address. If the From field is hidden:
-
Click Options in the message window.
-
Click From to show the field.
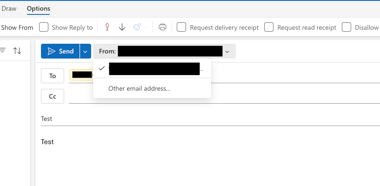
Sending from Outlook on the Web
-
Click the From dropdown above the message.
-
Select the shared mailbox address. If it is not listed, click Other email address and type the shared mailbox email.
Send As vs Send on Behalf: Which Should You Use?
These two options control what recipients see:
Send As - The email appears to come from the shared address (e.g., [email protected]). The recipient does not see which team member sent it. This is the default for shared mailboxes. It works best for customer-facing communication.
Send on Behalf - The email shows the sender's name on behalf of the shared address (e.g., "John Smith on behalf of [email protected]"). This adds transparency about who wrote the message.
| Send As | Send on Behalf | |
|---|---|---|
| Recipient sees | [email protected] | John Smith on behalf of [email protected] |
| Best for | Customer support, external communication | Internal teams, accountability tracking |
| Default for shared mailbox | Yes | No (must be explicitly granted) |
Most customer support teams prefer Send As for a unified brand voice. Use Send on Behalf when recipients need to know which team member replied.
Common Challenges and Troubleshooting

Shared Mailbox Not Showing in Outlook
Verify that the user has Full Access permissions. Restart Outlook. If it still doesn't appear, remove and re-add the account.
Unable to Send As the Shared Mailbox
Check that the user has Send As permission. This permission can take a few hours to propagate. Wait and test again.
Email Delivery Issues
Confirm the mailbox isn't full. Check that no mail flow rules are blocking messages. Verify that the email address and DNS records are correct. Use a free email health checker to confirm that SPF, DKIM, and DMARC records are set up right. If your DMARC record is missing or misconfigured, see our guide on how to check, verify, and validate your DMARC record. If outgoing messages are stuck on the agent's side rather than blocked by the server, see Outlook not sending emails for client-side fixes.
Permissions Not Updating
Permission changes sometimes take time. If you need immediate access, use PowerShell to force an update. Contact Microsoft support if the issue persists.
Conclusion
Office 365 shared mailboxes give teams a flexible, cost-effective way to collaborate on email. The best practices above will help you keep your inbox organized, your response times fast, and your team aligned.
Start with clear ownership rules and etiquette norms. Set up automation to reduce manual sorting. Audit permissions every quarter. And watch for the warning signs that tell you it is time to upgrade to a dedicated support tool.
If you need to route emails to another address, see our guide on setting up auto-forwarding in Outlook.
Shared mailboxes still have limits for customer support. See our breakdown of the problems with using Outlook as a helpdesk to understand when those limits start to hurt. If you are also rethinking your document management setup, check out our comparison of the best SharePoint alternatives for modern teams.
Enhance Your Team's Email Collaboration with SupportBee
If you want to go beyond what a shared mailbox in Office 365 offers, SupportBee can help. Our support ticket system simplifies collaboration and keeps your customer emails organized. You get a shared inbox, an integrated knowledge base, and a customer portal - all the tools you need to scale your support operations.
Start your free 14-day trial - no credit card required.
Frequently Asked Questions
How many people can access an Office 365 shared mailbox?
Microsoft doesn't set a hard limit on the number of members. However, performance degrades when you add more than 25 users. For large teams, consider splitting into multiple shared mailboxes by function (e.g., billing, support, sales) or using a dedicated shared inbox tool.
Do shared mailboxes need a license in Office 365?
No. Shared mailboxes are free as long as they stay under 50 GB. If you need more storage, you can assign an Exchange Online license to the mailbox. This increases the limit to 100 GB.
What is the difference between a shared mailbox and a distribution list?
A distribution list forwards emails to individual mailboxes. Each member gets a copy. There's no shared view or shared sent folder. A shared mailbox stores all emails in one place. Every member sees the same inbox, sent items, and folders. Shared mailboxes are better for collaboration because the team works from a single view.
Can I convert a shared mailbox to a regular mailbox?
Yes. In the Microsoft 365 admin center, select the shared mailbox and click Convert to regular mailbox. You'll need to assign a license to the converted mailbox. All emails and folders are preserved during the conversion.
How do I prevent duplicate replies in a shared mailbox?
Set up a "claim before you reply" rule. Before drafting a response, the agent marks the email with a category or flag that signals ownership. Some shared inbox tools offer collision detection that alerts you when another agent is typing a reply to the same email.
Can I use a shared mailbox with mobile Outlook?
Yes. Open the Outlook mobile app, go to Settings, and add the shared mailbox as an additional account. You can read and reply from the shared address on your phone. Note that some features, like categories and rules, have limited support on mobile.
How do I set up auto-replies for a shared mailbox?
Open the shared mailbox in Outlook on the web. Go to Settings > Automatic replies. Write your auto-reply message and set a date range if needed. This works well for out-of-office notices and acknowledgment emails that confirm you received a customer's message.
What is shared mailbox etiquette?
Shared mailbox etiquette is the set of team norms for using a shared mailbox. Key rules include claiming an email before replying, never deleting shared messages, using internal channels for team discussions, and keeping drafts short-lived. Good etiquette prevents duplicate replies and keeps the mailbox organized.