How to Create a Group Email in Gmail

Communication is key in today’s digital world, where email, Slack, and other digital communication tools reign over more traditional methods, like phone and mail. In 2024, the average worker spends about 20 hours per week using digital communication tools.
Gmail’s group email feature is just one of many features the email provider offers to simplify business communications. This handy tool allows you to email several people you’ve grouped into one label, and it’s incredibly easy to use once you know how to set up your group. In this step-by-step guide, we’ll cover how to create a group email in Gmail.
In this article:
- What is a Group Email in Gmail?
- How Do Businesses Use Group Email in Gmail?
- How to Create a Group Email in Gmail: Two Step-By-Step Methods
- Helpful Tips for Creating and Using Group Emails in Gmail
- Group Email Alternative
- Frequently Asked Questions
What is a Group Email in Gmail?
Think about the way you’d normally send an email to several people in Gmail. To do this, you’d probably enter each email address separately in the “To” field or the “CC” or “Bcc” fields, if necessary.
A group email in Gmail lets you send one email to multiple recipients without manually entering each email address using groups of contacts you create in Gmail, simplifying the overall process.
How Do Businesses Use Group Email in Gmail?

How Do Businesses Use Group Email in Gmail?
Businesses might use this feature to email departments, teams, or customers at one time. Consider the following situations when a Gmail group email could come in handy:
- Departmental Team Updates: A marketing manager wants to regularly update the sales team and analytics team on the current marketing campaign. They might create a Gmail group for the sales team and a separate one for the analytics team to communicate with the teams separately or together, depending on the updates they need to provide.
- Customer Support Teams: A business’s customer support team uses the Gmail Groups feature to create a shared email inbox to communicate with customers quickly.
- Project Collaboration: A project manager wants to host monthly meetings so their team can collaborate and discuss the project. The project manager might send a group email to everyone on the team with the details for the upcoming monthly meeting. They can also email the group after the meeting with meeting notes.
- Company-Wide Communications: A company CEO might create a Gmail group that includes all employees at the company, separate from other contacts, like stakeholders or vendors. The CEO can use this group to send emails about new product launches, company policy updates, or changes within the company.
How to Create a Group Email in Gmail: Two Step-By-Step Methods
The following sections break down the two ways to create a group email in Gmail, with step-by-step instructions to guide you through the process.
Method 1: Create a Group from Your Gmail Contacts
This method shows you how to create a group in Gmail using Gmail contacts already in your Google account. We also guide you through creating contacts if you don’t already have them saved in your Google account.
Step 1: Locate Your Contacts
Click the grid icon in your Gmail account, which is located next to your profile picture. Then, click the Contacts icon.
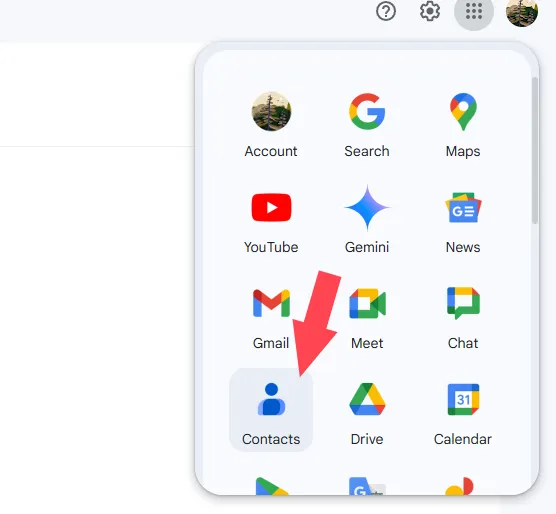
Locate your contacts.
How to Add Contacts
If you don't already have contacts saved in your Google account, that's okay. Follow these steps to create a new contact that you can later add to your group.
1. Click on the grid icon in the upper right corner of your Gmail account, right next to your profile picture. Then, click on the Contacts icon to bring up your Contacts dashboard.
2. Click “Create contact.”
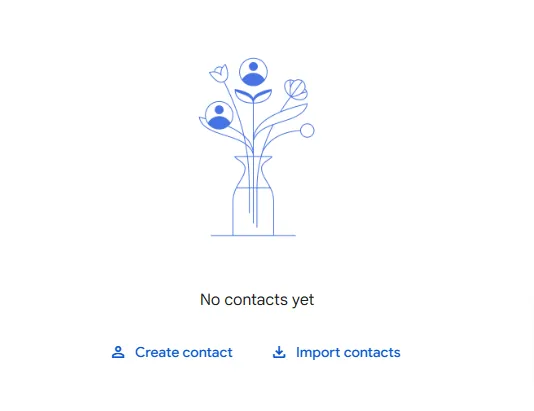
Click “Create contact.”
3. Fill out each field with your contact’s information. Add a profile picture for the contact, if you’d like.
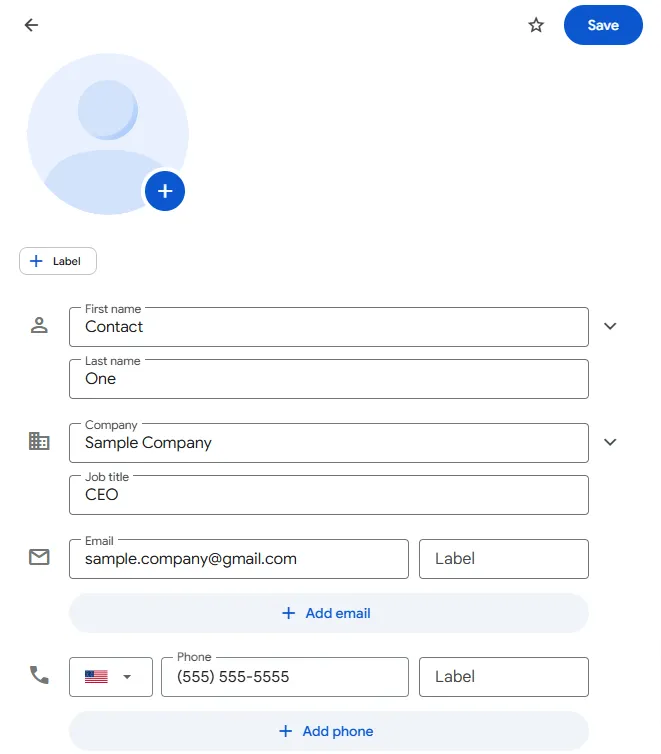
Fill out each field with your contact’s information.
4. If you’d like to add a label, tap the + Label button, followed by ‘Create Label.’ This allows you to categorize your contacts and their emails with labels like ‘Vendors’ or ‘Managers.’
5. Click the blue Save button in the upper right corner of the Contacts page to save your contact after you fill out each field.
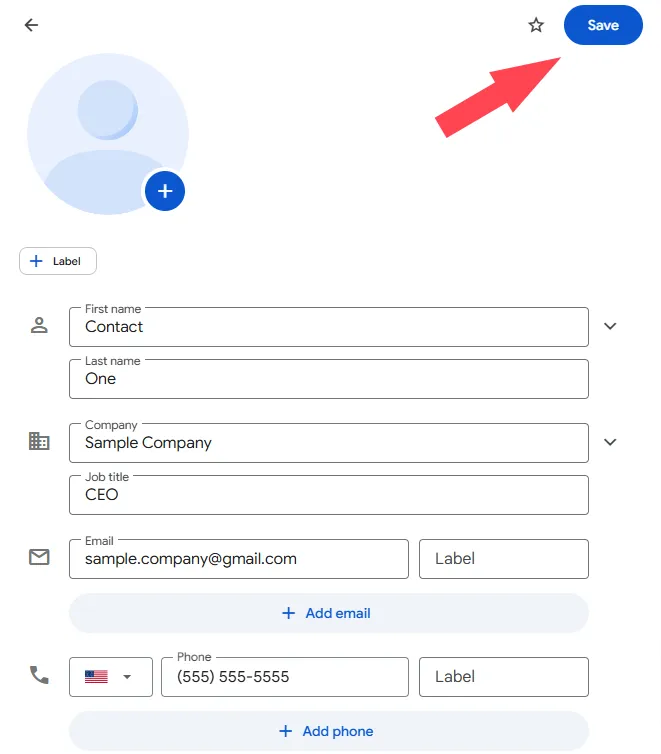
Click the blue Save button in the upper right corner of the Contacts page.
6. Continue this process for every contact you’d like to add to your Gmail account. Alternatively, after adding one contact and returning to the Contact dashboard, you can click on ‘Create multiple contacts’ to add contacts in bulk.
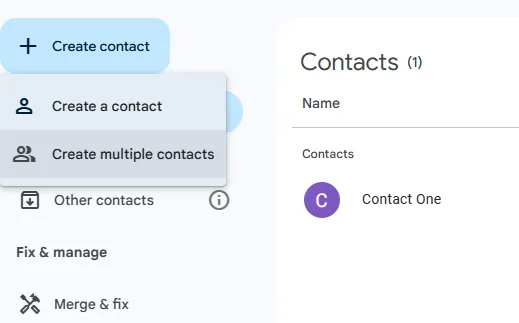
Repeat this process for every contact you’d like to add.
7. Doing so pops up the following screen, where you can quickly add names and email addresses for each contact. If you’d like to edit their information later, simply return to your Contacts dashboard and edit each contact individually.
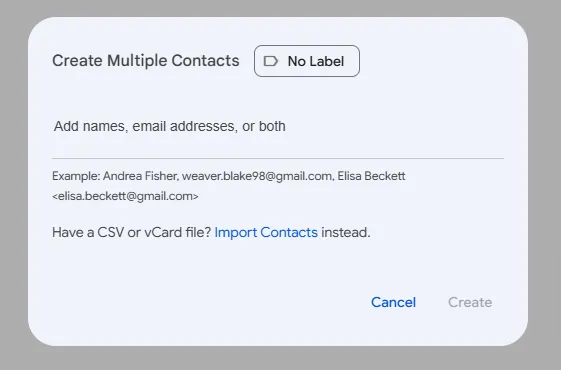
Add names and email addresses for each contact.
Step 2: Choose the Contacts to Add
From your Contacts list, choose the contacts you’d like to add to your group in Gmail. Do this by ticking the box next to each contact you want to add.
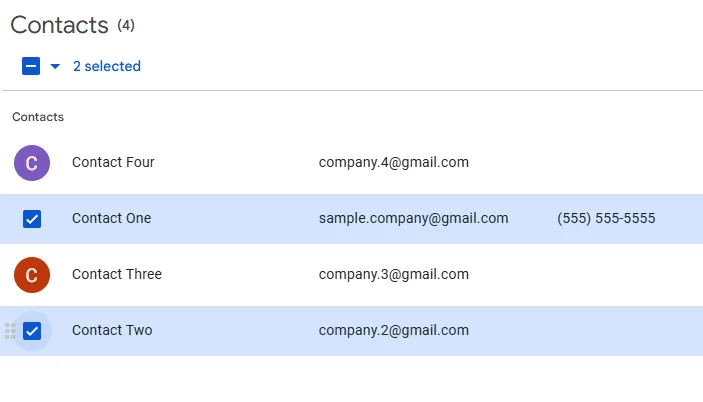
Choose the contacts to add.
Step 3: Label the Contact Group
With each contact still selected, click on the label icon, followed by ‘Create label.’
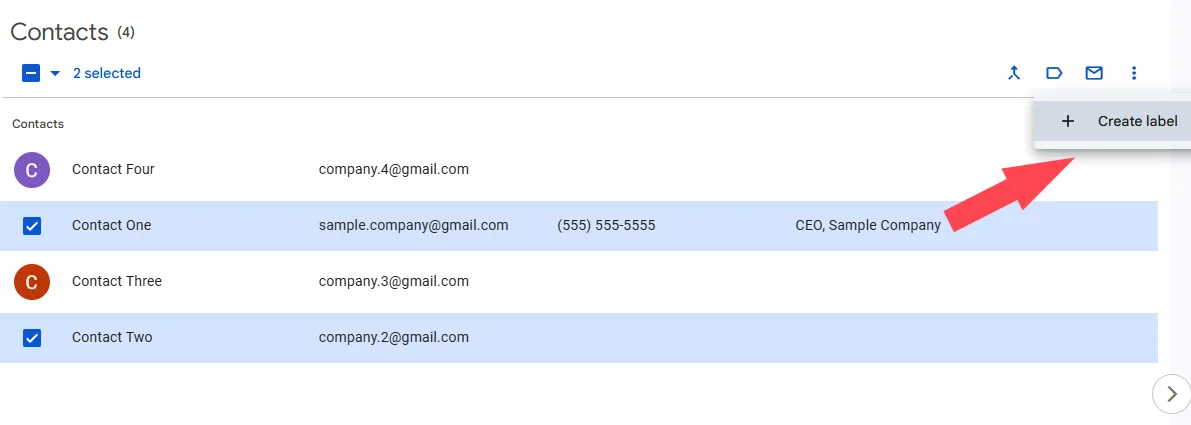
Label the contact group.
Type the label name into the pop-up box and tap the ‘Save’ button.
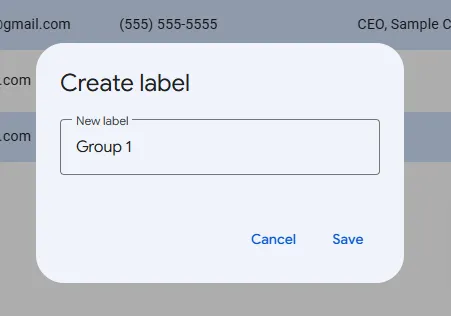
Type the label name into the pop-up box and tap the ‘Save’ button.
You can now view your new group by clicking the label name on the left sidebar.
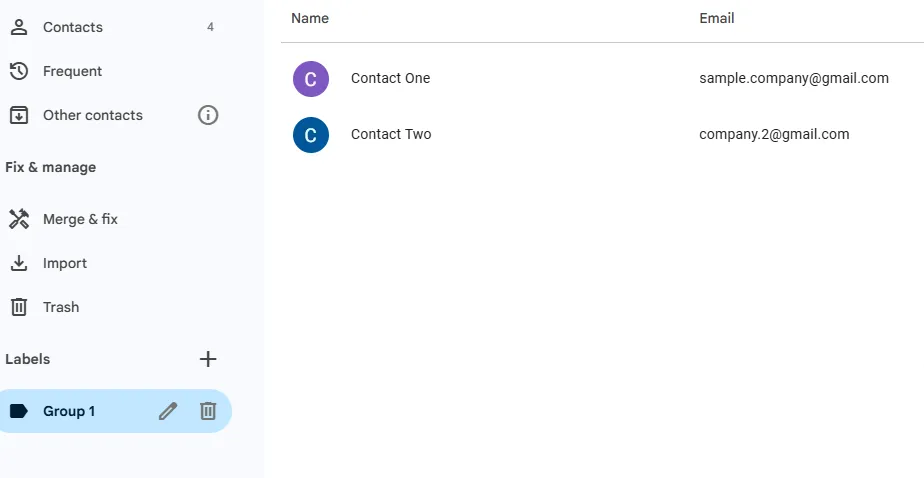
View your new group by clicking the label name on the left sidebar.
Step 4: Send an Email to Your New Group
To send an email to your new group in Gmail, go back to your Gmail dashboard and click the ‘Compose’ button.
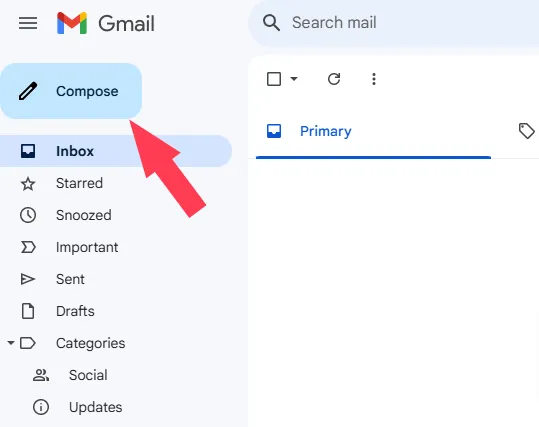
Go back to your Gmail dashboard and click the ‘Compose’ button.
In the pop-up box, find the ‘To’ field. Click on it and begin typing your label name. Click the label name to fill the field with all contacts within that label. Type your email and hit send to send the email to each contact in your group.
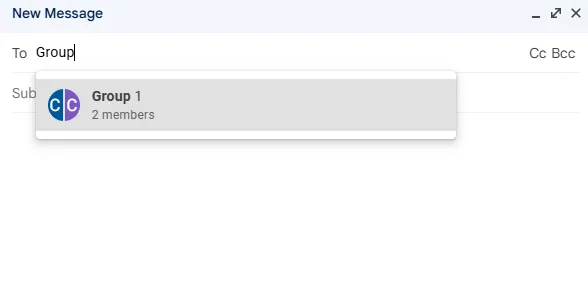
Click on the 'To' field and begin typing your label name.
Method 2: Create an Email Group Using Google Groups
The second method involves using the Google Groups feature to create a shared inbox in Gmail where you can send email to and receive emails from people within your group. This creates a collaborative inbox that's ideal for team communication.
Because the group feature has privacy settings, it’s an excellent method for organizations to send mass communications while having some control over who can access group messages.
Step 1: Access Google Groups
You might have a Groups icon in your Google grid menu, near where you’d find the Contacts icon. If not, you can still access Google Groups via its separate website.
Step 2: Create a Group
Click on ‘+ Create group’ in the upper left corner of the page.
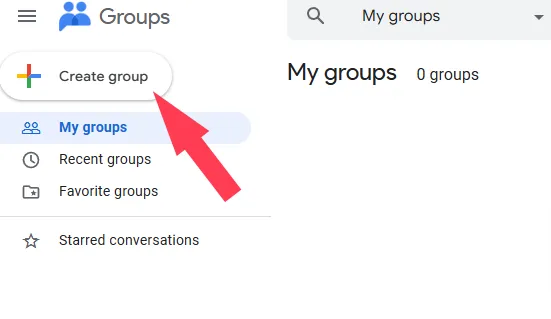
Click on ‘+ Create group’ in the upper left corner of the page.
Step 3: Fill Out Group Details
A pop-up box will appear with a few details to fill out, like a group name, group email, and group description. Fill out each detail and click ‘Next.’
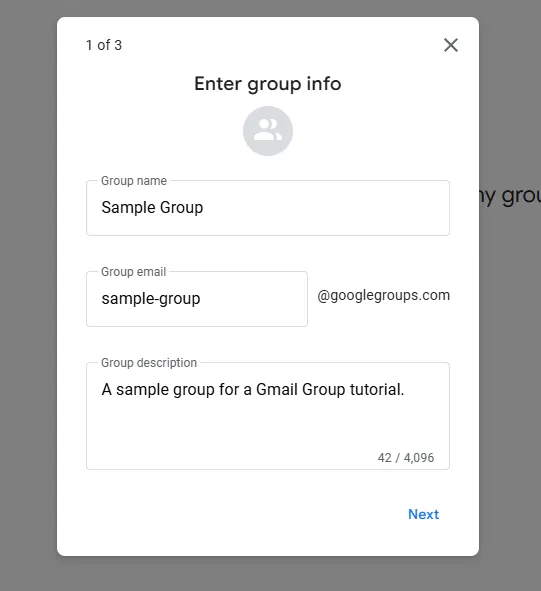
Fill out each group detail and click ‘Next.’
Step 4: Adjust Privacy Settings
On the next screen, adjust the privacy settings for your group. You can control who can search for and join the group, who can view members and conversations, and who can post within the group.
Use the drop-down boxes to change your settings, and click on the dot in each slider to change permissions. Tap ‘Next’ when you’re finished with this step.
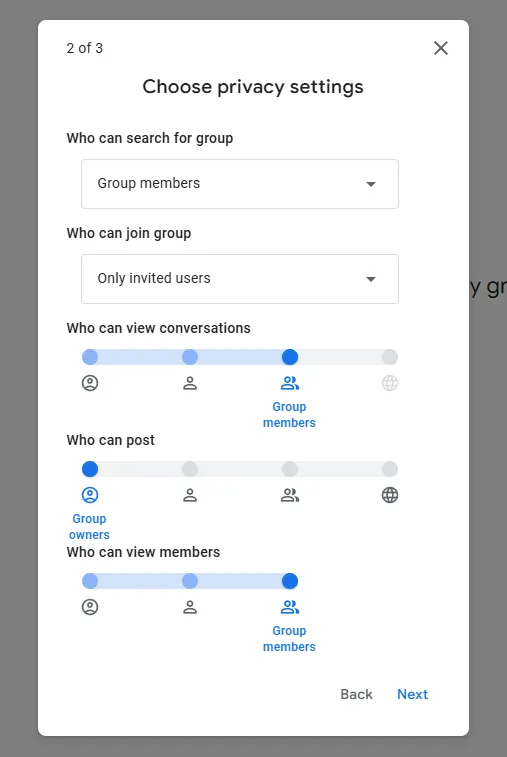
Adjust the privacy settings for your group.
Step 5: Add Members to the Group
Now, add members to your group by typing in the email addresses of each person you want to add. Write an invitation message below the email addresses, which will be sent along with the invite.
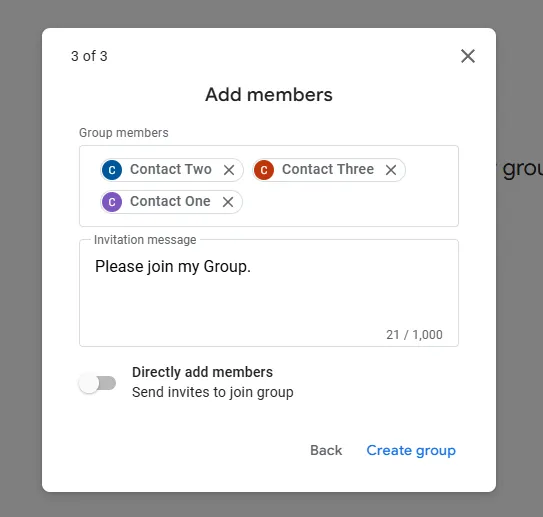
Type the email address of each person you want to add.
If you want to add members directly to the group without inviting them, toggle the ‘Directly add members’ switch. Then, you’ll have the option to name group managers and owners, write a welcome message, and change the subscription settings.
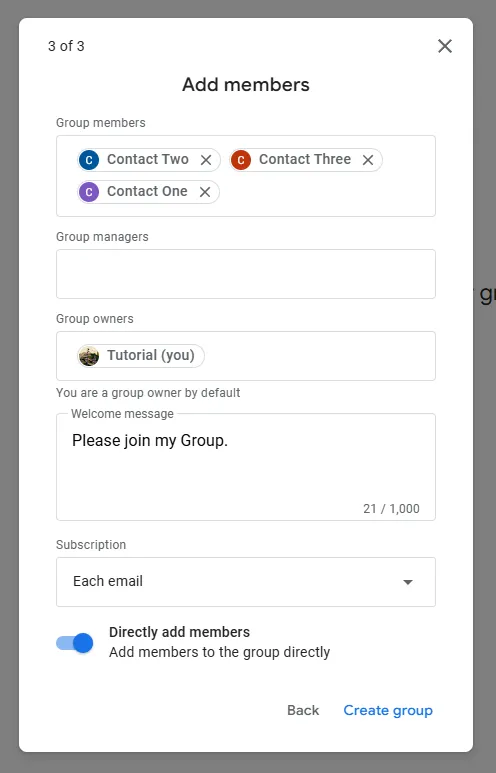
Toggle the ‘Directly add members’ switch to add members directly without inviting them.
Step 6: Send an Email to Your Group
From the Groups dashboard, click the ‘+ New conversation’ button.
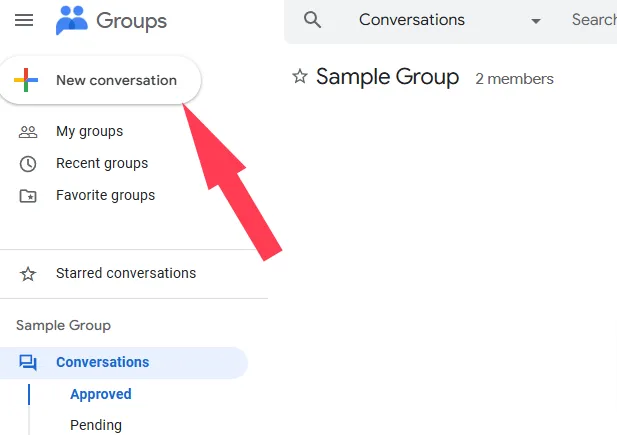
From the Groups dashboard, click the ‘+ New conversation’ button.
In the ‘To’ field of the Compose box that pops up, type the email address for your group.
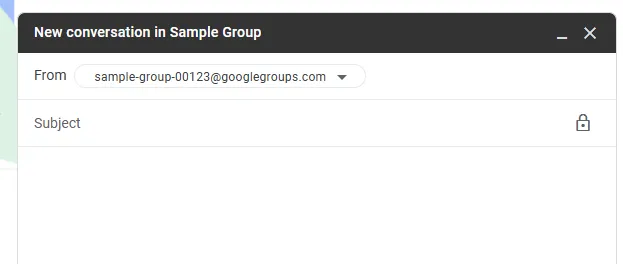
Type the email address for your group in the 'To' field.
Complete the rest of the email as usual, and press the ‘Send’ button when you’re finished. Any emails sent to and from the group email address are viewable in your Groups dashboard.
Helpful Tips for Creating and Using Group Emails in Gmail
Make the most of your group emails in Gmail with these helpful tips.
Consider Whether Groups are the Best Option
Group emails may not be suitable for every business correspondence. For example, some business emails might require more personalization, and some people within an organization may not need as frequent updates or reminders as others.
Likewise, using Gmail Groups to communicate with multiple customers at one time rather than a customer support portal can feel impersonal to customers. Use caution when creating groups and sending group emails to ensure that each email is necessary and serves a legitimate purpose.
Make Your Emails Relevant for the Entire Group
Avoid referencing specific things only a few people in the group would understand. This can make people within your group feel singled out and others left out.
It can be challenging to personalize a group email for the entire group, but it’s important to make it feel relevant to each person included. Creating smaller, more segmented groups can be a good idea for a large organization to deliver more personalized communication.
Update Your Groups Regularly
It’s important to keep groups up-to-date as people enter and leave your organization or switch teams. Check over your groups every quarter, at least, to cull contacts who are no longer with the company, update team groups and customer contact lists, and add new employees to relevant Gmail groups.
Group Email Alternative
Boost your support process with collaborative inboxes! Discover how: https://t.co/d965r2HOTe
— SupportBee (@supportbee) April 10, 2024
Group emails in Gmail can be an excellent way to communicate with others in the same company or even for personal use to send emails to family and friends. However, when it comes to customer support, an online ticketing system is often the best way to go. SupportBee helps support teams collaborate on and prioritize customer support tickets, keeping every customer interaction organized for reliable assistance.
Start a free SupportBee trial today to learn how it works.
Frequently Asked Questions
Where is the Groups button in Gmail?
Some Gmail accounts have the Groups button listed within the Google apps grid in the top right corner of their screen. If you don’t see the Groups button in the apps section, you can visit groups.google.com to access the feature.
Can I import a contact list into Gmail?
Yes—Gmail allows you to import contact lists saved on your computer from other services, like Outlook. To do so, log into your Gmail account and click the grid in the upper right corner of the screen, followed by the Contacts tab.
Click the Import button in the left sidebar. This pops up a box asking you to upload a CSV or vCard file you have saved on your computer. Select the file and press the ‘Import’ button to import the contacts from the file into Gmail.
How can I send a mass email in Gmail?
You can use one of two methods to create mass emails to multiple contacts in Gmail. First, create a group from your Gmail contacts by adding multiple contacts to one Gmail label. When finished, compose a new email and type the name of the label in the ‘To’ field to email all contacts under that label.
With the second method, you’ll create a Google Group, which opens a collaborative Gmail account between you and other members of the group. Email the group email address to send the same email to all members of the group simultaneously.