15 Tips to Organize Your Gmail Inbox

Email is still one of the main ways companies conduct business, whether the communication is in-house or with customers. And if you're receiving hundreds of emails a day, your inbox can become cluttered quickly, which makes it difficult to stay on top of important issues. However, there are numerous ways to keep your email inbox organized.
Gmail offers many opportunities for better organization so critical emails don't fall through the cracks. Additional outside tools, like a shared inbox, also exist to help you maintain your inbox effortlessly so you can collaborate with your team and communicate with customers.
In this post, we’ll share 15 expert tips to organize your inbox, including:
- Customize your Gmail layout
- Group emails into conversations
- Use a shared inbox to keep track of customers
- Manage categories in your inbox
- Set up a filter to streamline what lands in your inbox
- Create labels to categorize emails
- Use a comment section to discuss an email
- Archive older emails you want to keep
- Mute email threads when necessary
- Assign emails to certain people
- Use multiple inboxes
- Set up multiple email addresses
- Enable desktop notifications
- Use the star option
- Take advantage of the snooze option
1. Customize your Gmail layout
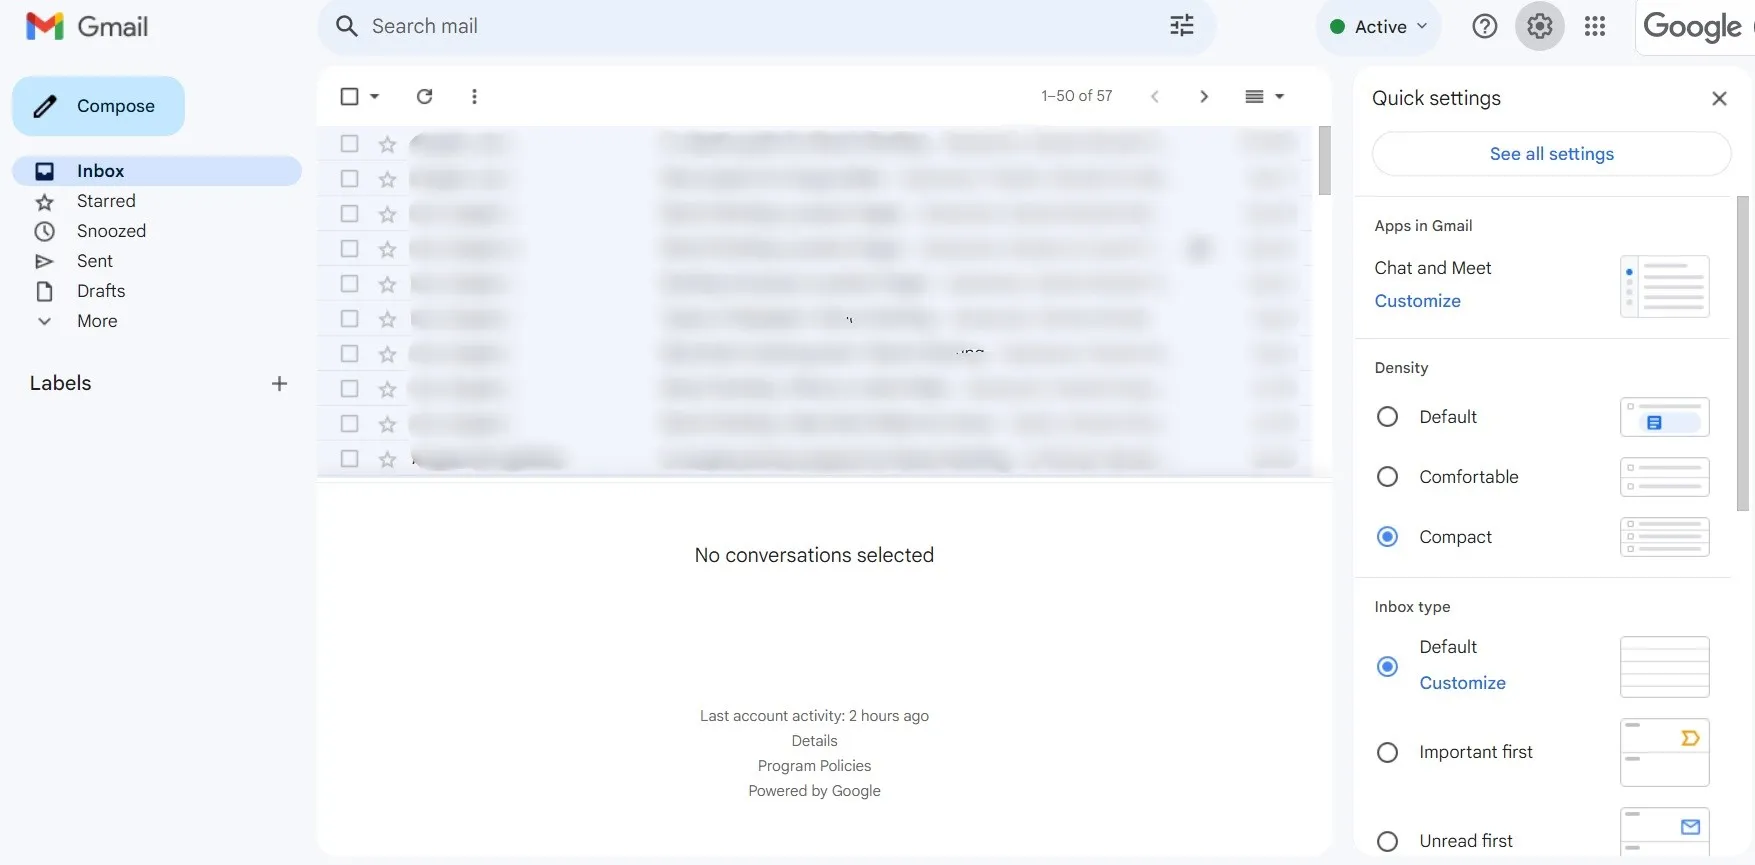
Customize your Gmail layout
One of the best tips for organizing your Gmail inbox is to customize it to your personal preferences. Setting the reading pane, font, and even background color can make it easier for you to sort through your emails.
Click on the 'Settings' icon (the gear symbol) in the upper right corner of your Gmail account. A 'Quick settings' box will open up for you to choose the changes you would like to make.

Select your changes in the Quick settings box
Alternatively, go into your 'See all settings' option and choose 'Inbox' on the top menu. You'll be able to choose which type of message is displayed in your main email tab, as well as how your reading pane is showcased.
2. Group emails into conversations
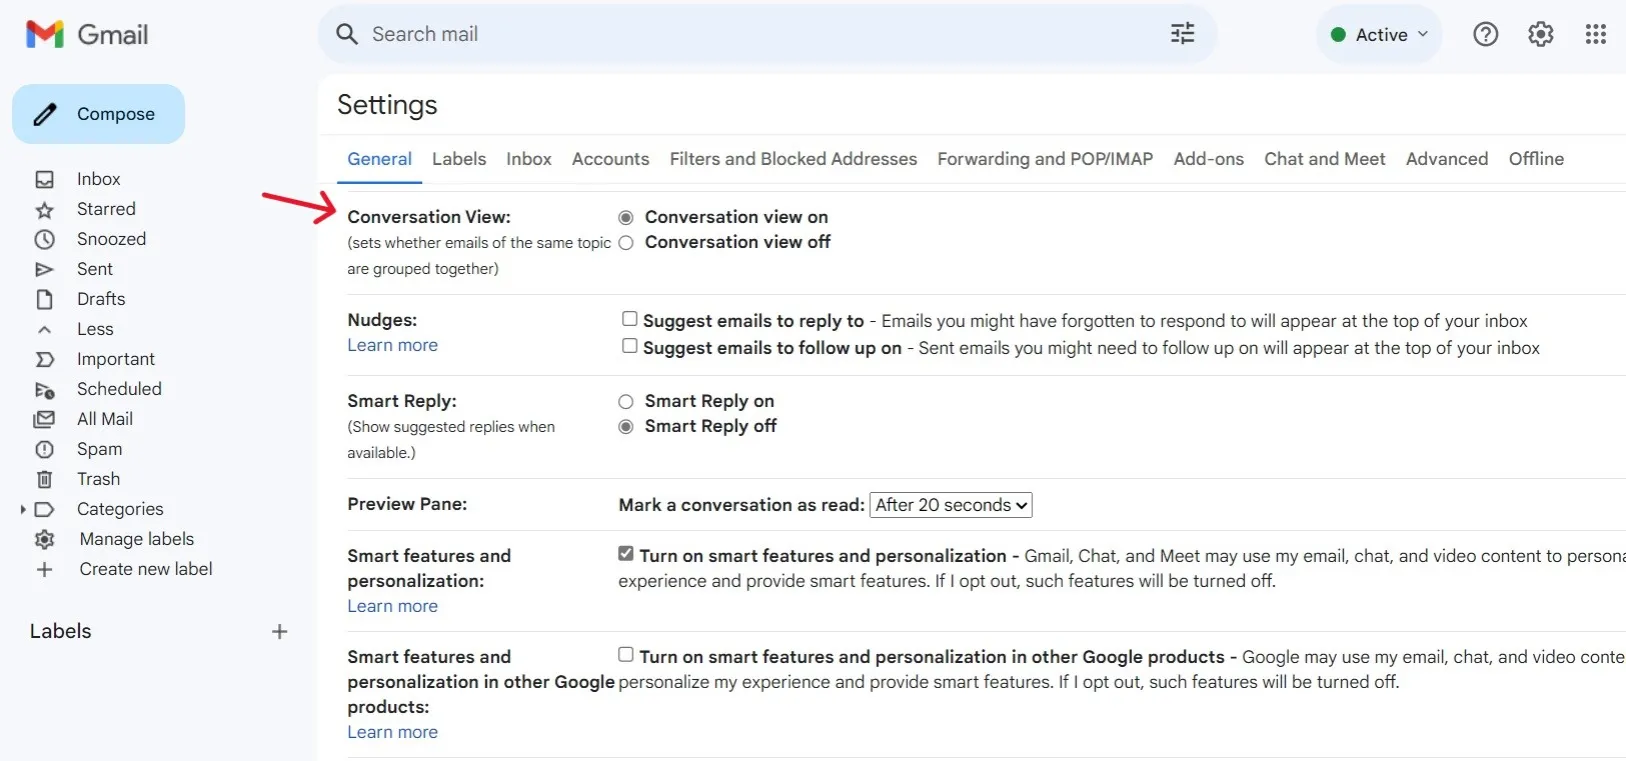
Group emails into conversations
Grouping an email into a conversation view allows you to see the entire topic in one email thread, as opposed to multiple separate emails.
Go to the 'General' tab at the top of your 'Settings' menu and scroll down to 'Conversation View'. Turning this option on allows you to set emails with the same topic to be grouped together, conversation style. Note that the email will be considered new should the subject line change or there are more than 100 emails in one conversation.
3. Use a shared inbox to keep track of customers
A shared inbox solution like SupportBee works just like regular email, except you're able to collaborate with other members of your team within your email. Each individual user has their own log-in but is able to read, view, and edit emails within the shared box.
A shared inbox helps to ensure all incoming email is dealt with in a timely manner and your customers don't get lost among a heavy workflow influx. Plus, it can integrate with other tools you’re already using to streamline your workflows.
4. Manage categories in your inbox
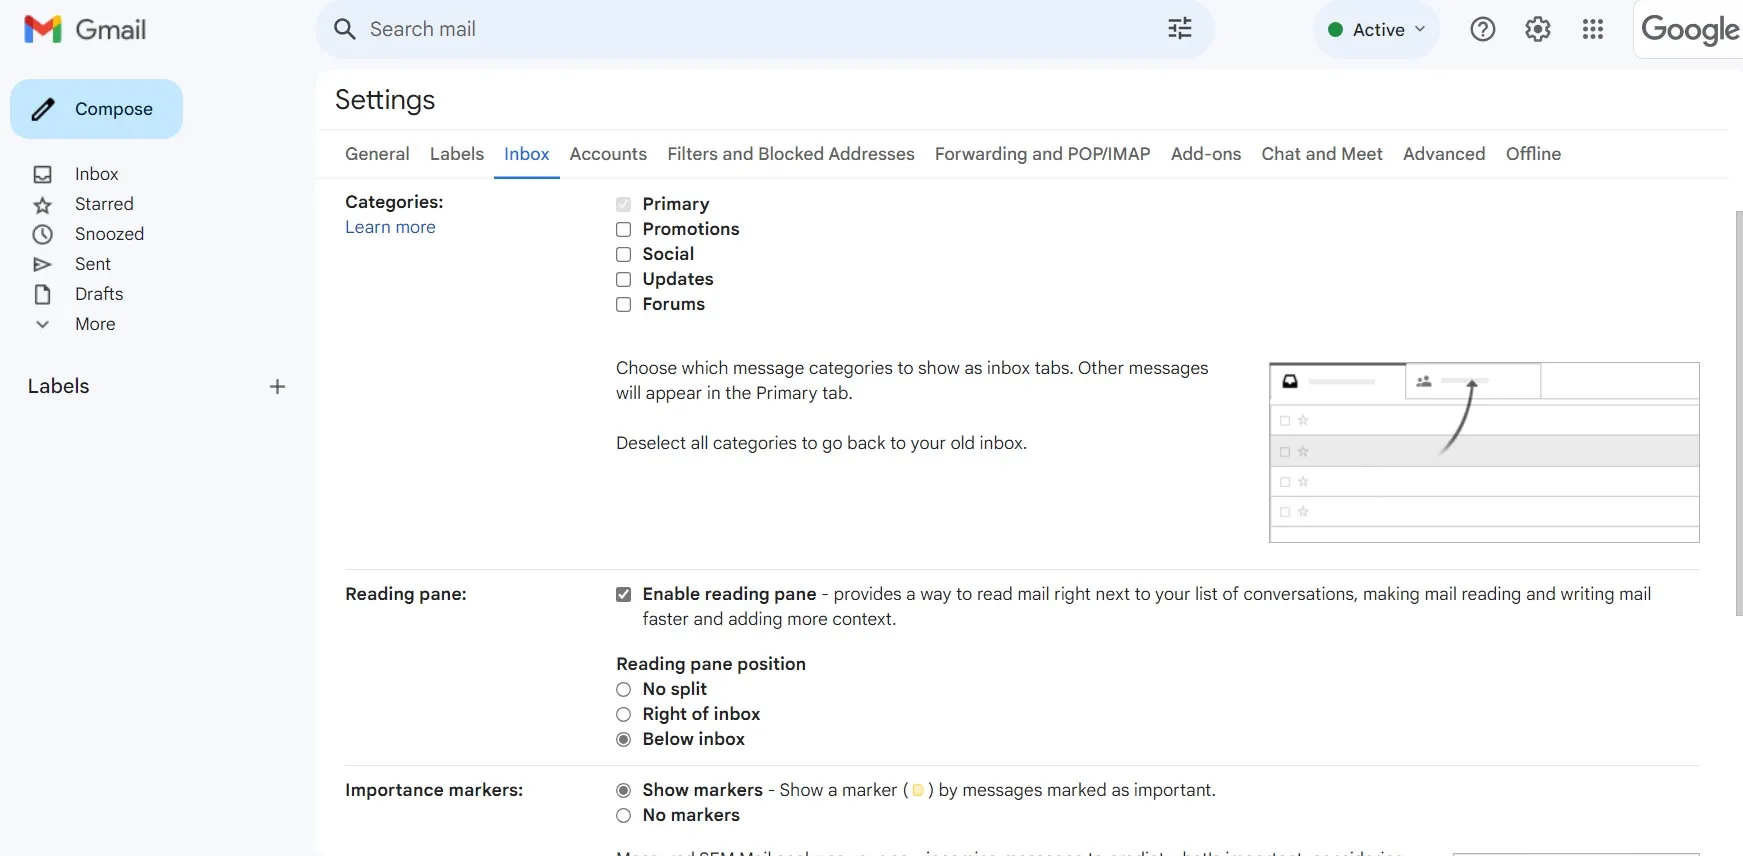
Manage categories in your inbox
Inbox categories are automatically filtered by Gmail and include primary, promotions, socials, updates, and forums. Whenever an incoming message fits into one of these categories, it's filtered into its respective category.
Add or remove inbox categories in your main settings window. Go to 'Inbox' in the top menu. Choose which categories you would like displayed in your inbox.
Simply uncheck any category you wish to hide from view.
5. Set up a filter to streamline what lands in your inbox
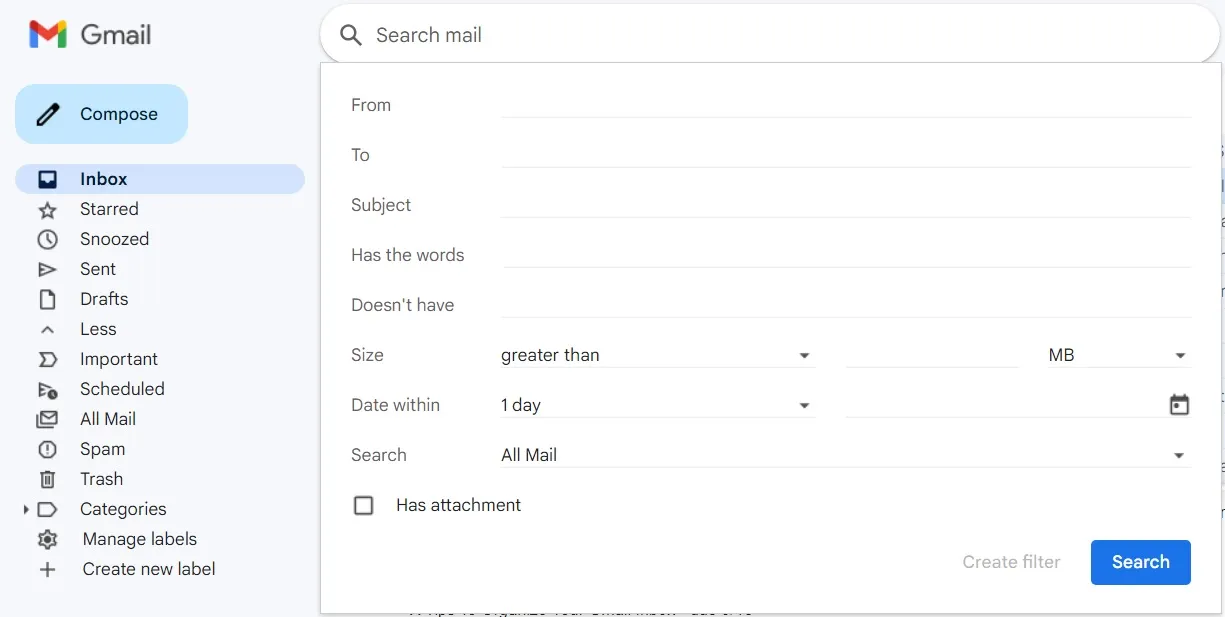
Set up a filter to streamline what lands in your inbox
Though Gmail automatically filters out spam, you can set up a more detailed filter to prioritize what lands in your inbox. You can filter messages by subject, sender, recipient, size, date, attachments, and more.
Go to the search box at the top of your email window. Click on the icon to the right of the box that says 'Show search options.' Fill out the pop-up window with your desired filter options and click 'Create filter.'
Alternatively, open an email you want to filter. Choose the 'More' icon, located at the far right, depicted as three vertical dots, and click on 'filter messages like this.' Fill out the pop-up window with your desired filter criteria and click 'Create filter.'
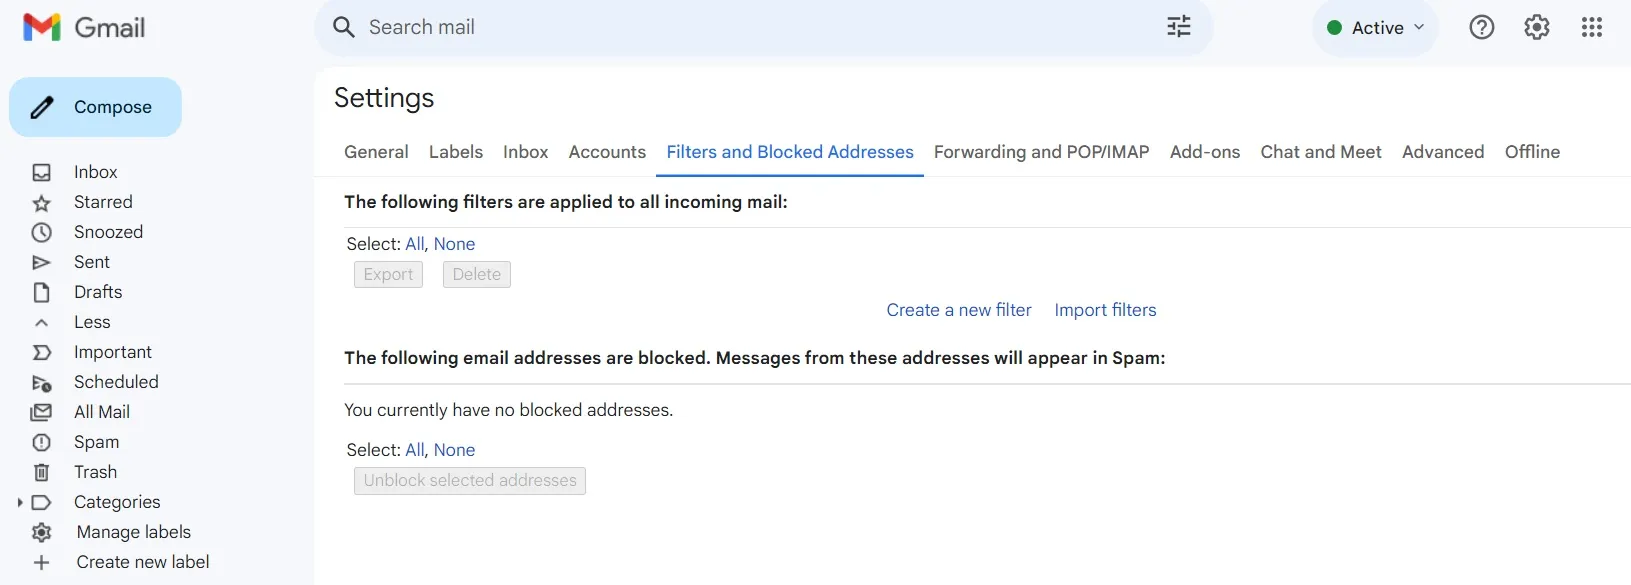
Create an email filter
To edit or delete existing filters, go to settings and choose 'Filters and Blocked Addresses' on the top menu.
6. Create labels to categorize emails
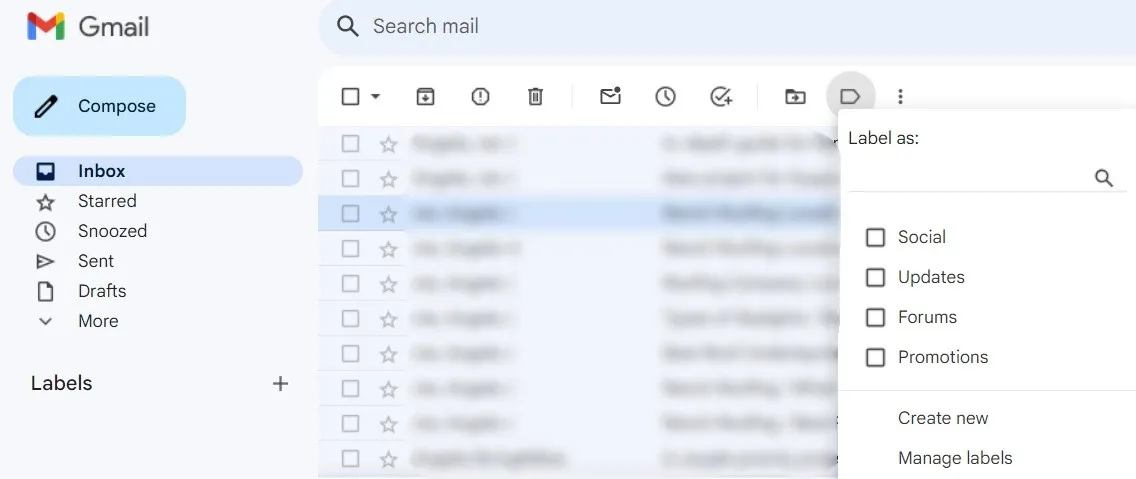
Create labels to categorize emails
Create a label for your emails to organize them into categories. Use as many labels as you want; only you will see them. Add labels to your inbox messages, messages you're writing, or move a message to another label.
Click on the label icon (shaped like a label tag) and choose from an existing label or create a new one. Alternatively, you can choose 'Manage labels', which brings you to your settings, where you can further filter your labels to show up or be hidden.
Check out this video for more about how you can use labels to organize your Gmail inbox:
7. Use a comment section to discuss an email
When you use customer support software like SupportBee, you have the opportunity to use a comment section for discussing emails without it being within the body of the email. This way, you can hold discussions among your team members without the customer or recipient seeing your conversation.
8. Archive older emails you want to keep
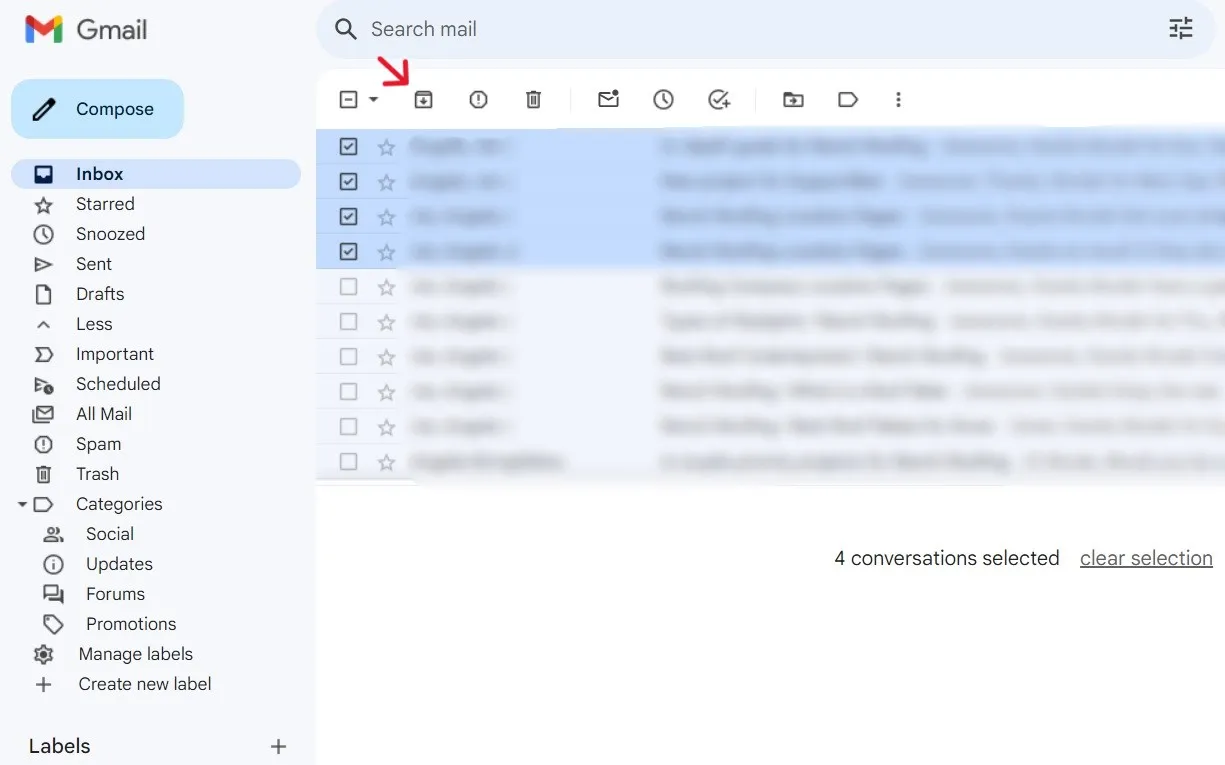
Archive older emails you want to keep
Archive emails you want to hang onto but that don't need to be front and center. Archived emails are stored away from your inbox but are readily accessible when you need them.
Check the emails you want to keep, then click the 'Archive' icon, depicted with a down arrow. To find your archived emails, click on 'All Mail' in your left-hand sidebar menu.
9. Mute email threads when necessary
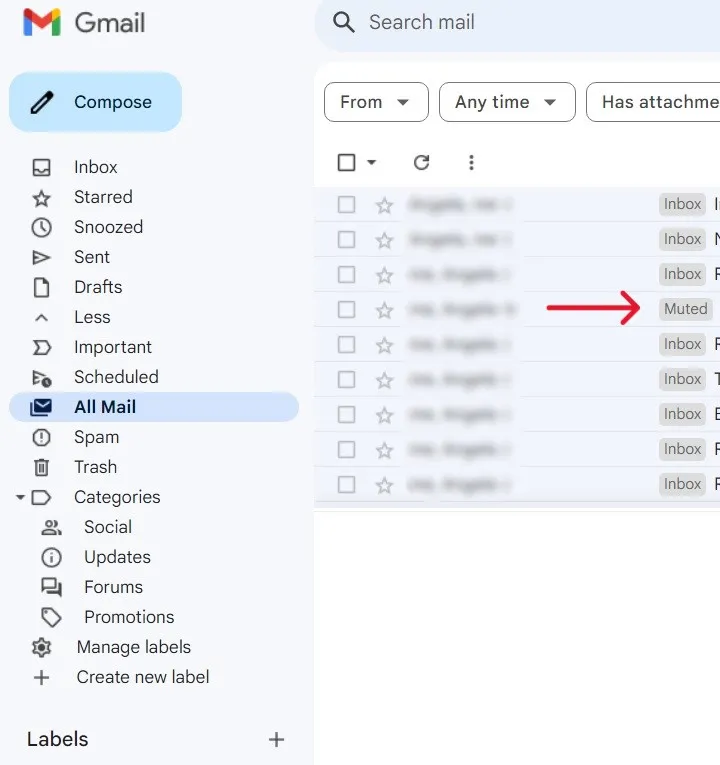
Mute email threads when necessary
If an email thread has gotten long but you still need all the information being shared within the email, you can mute it so it no longer pops up as new in your inbox every time someone replies. Email conversations that have been muted can be found in the 'All Mail' selection in your left-hand sidebar menu.
To mute an email thread, check the box next to the email conversation you want to mute. Then click on the 'More' icon, depicted by three vertical dots, and click on 'Mute'. Go to 'All Mail' to find it or unmute it.
10. Assign emails to certain people
Customer support software like SupportBee allows you to assign emails to teams or certain members of your team. An assigned email shows up in the member's personal inbox instead of the general shared inbox.
11. Use multiple inboxes
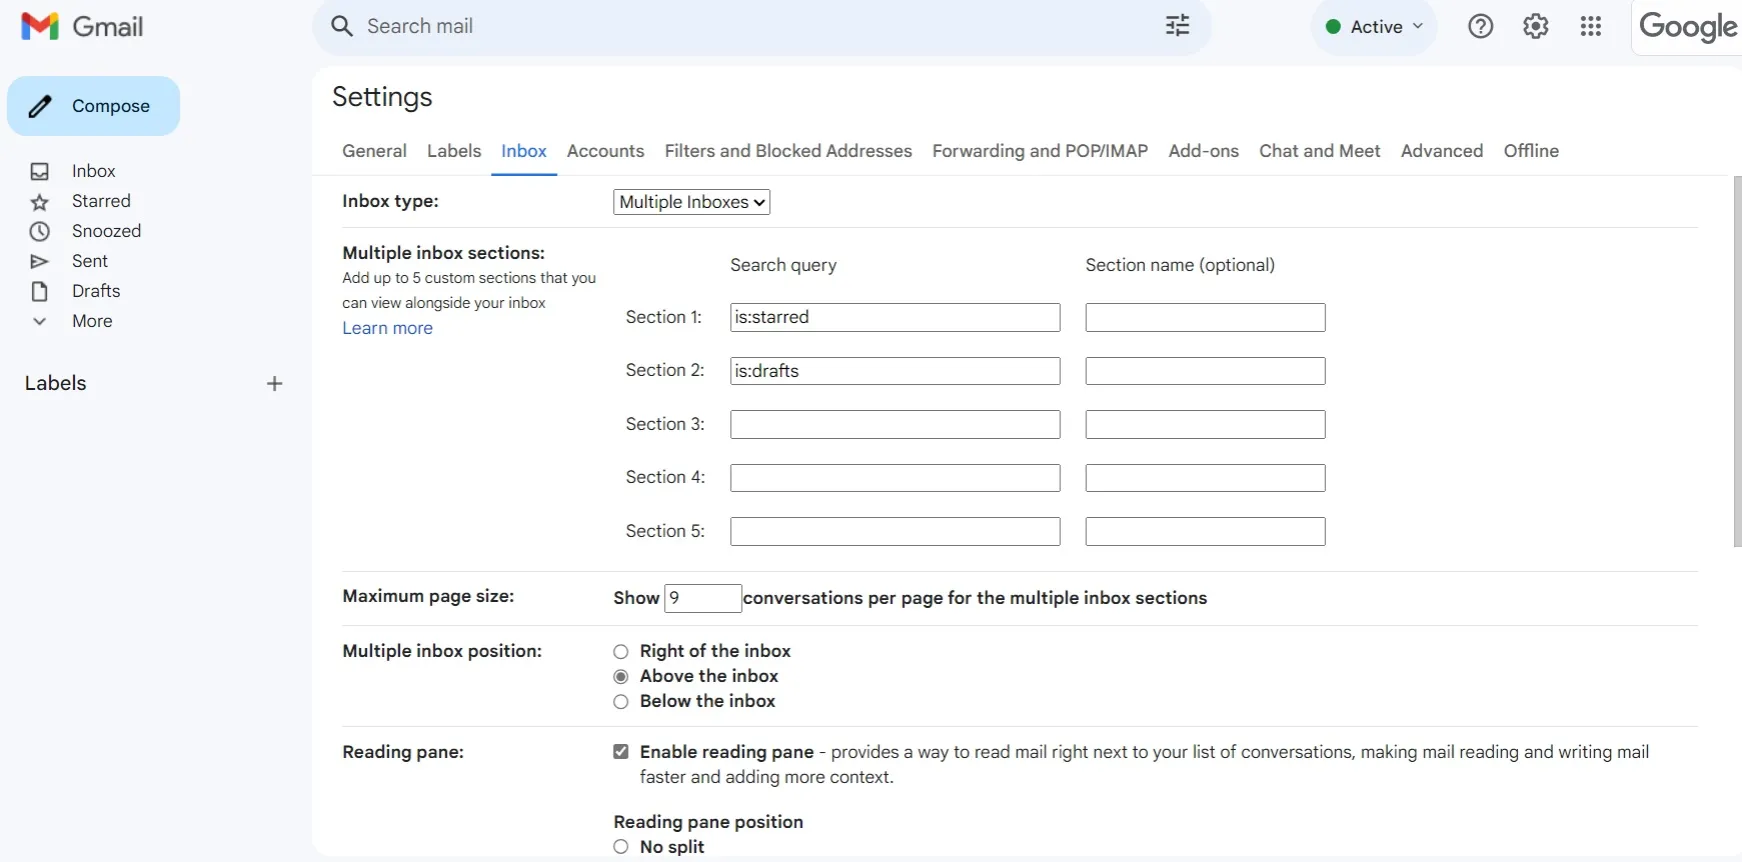
Use multiple inboxes
If you're working on a computer or laptop, you can set up multiple inboxes in your Gmail account. Click on the 'Settings' icon and either choose 'Multiple inboxes' in the 'Quick settings' sidebar.
Alternatively, go to the 'Inbox' section of your 'Settings' screen and choose the 'Multiple Inboxes' in the drop-down menu for 'Inbox type.' Customize up to five different search queries that you'll be able to view alongside your primary inbox.
12. Set up multiple email addresses
When your Gmail address represents an all-in-one landing zone, it can get rough trying to sort through it all. A nifty trick for organizing hundreds of emails includes setting up multiple email addresses within your main Gmail account.
Designate your email address for various categories using a plus sign. For instance, [email protected] can be used when you're food shopping or [email protected] for emails connected to your gym membership. Then you can easily filter your messages with your noted differences.
13. Enable desktop notifications
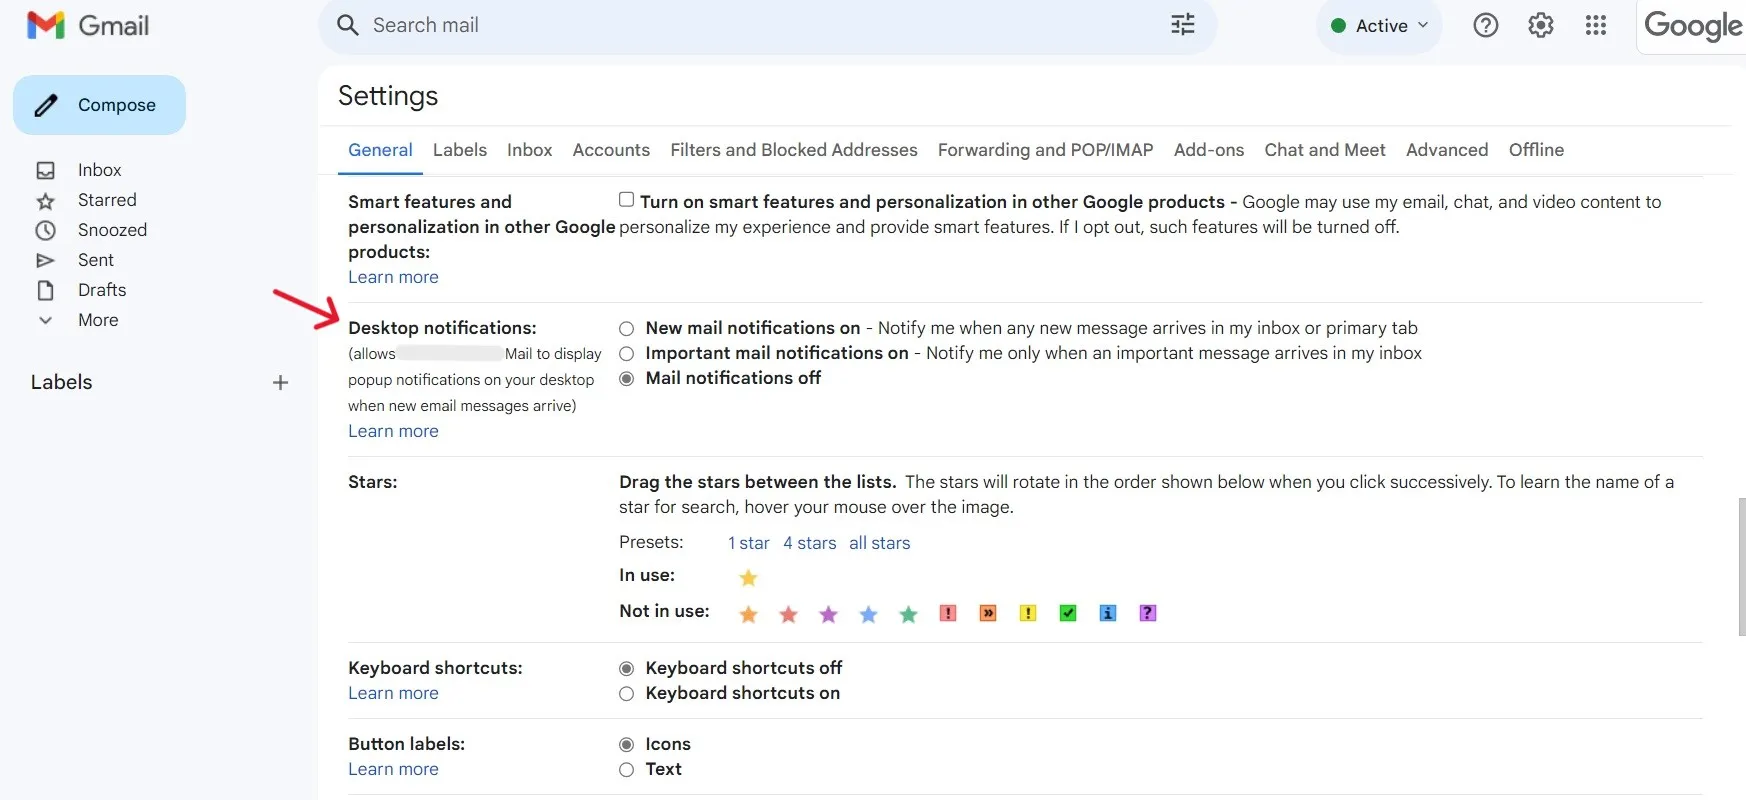
Enable desktop notifications
When you don't want to miss an important email, turn on your desktop notifications for new emails. You have the option of getting notifications for all new emails or only the ones deemed important.
Find your desktop notifications option in your 'Settings' window under the 'General' tab.
14. Use the star option
Gmail's algorithm determines what emails are important, but the quickest way for you to flag them as important is to use the star option. Just click on the star next to your chosen email to highlight it.
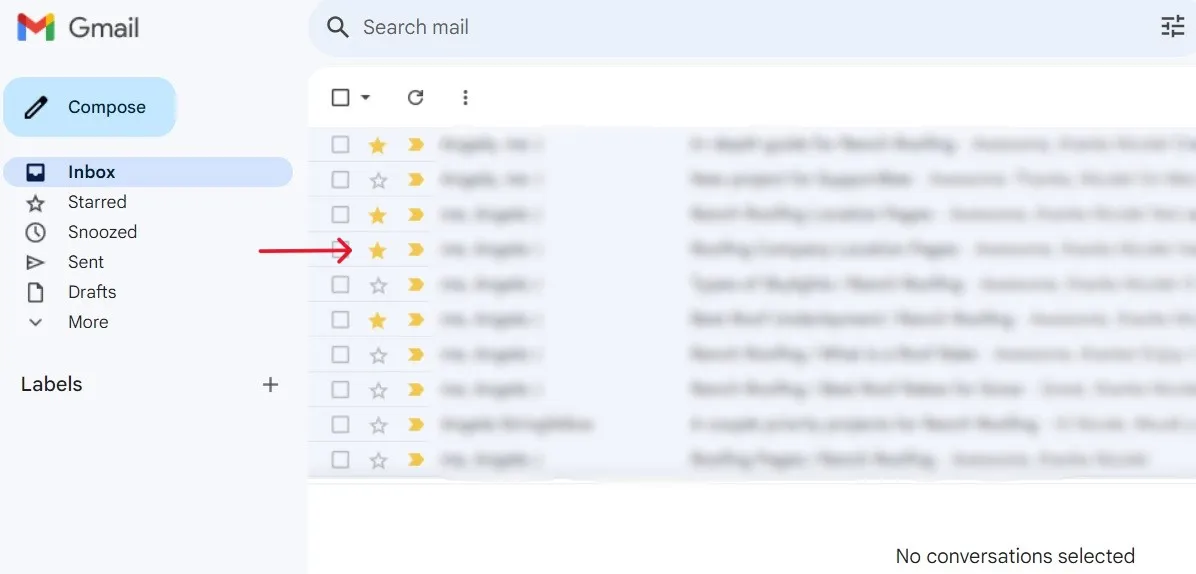
Use the star option
To find all of your starred emails, click on 'Starred' in your left-hand side menu, under 'Inbox.'
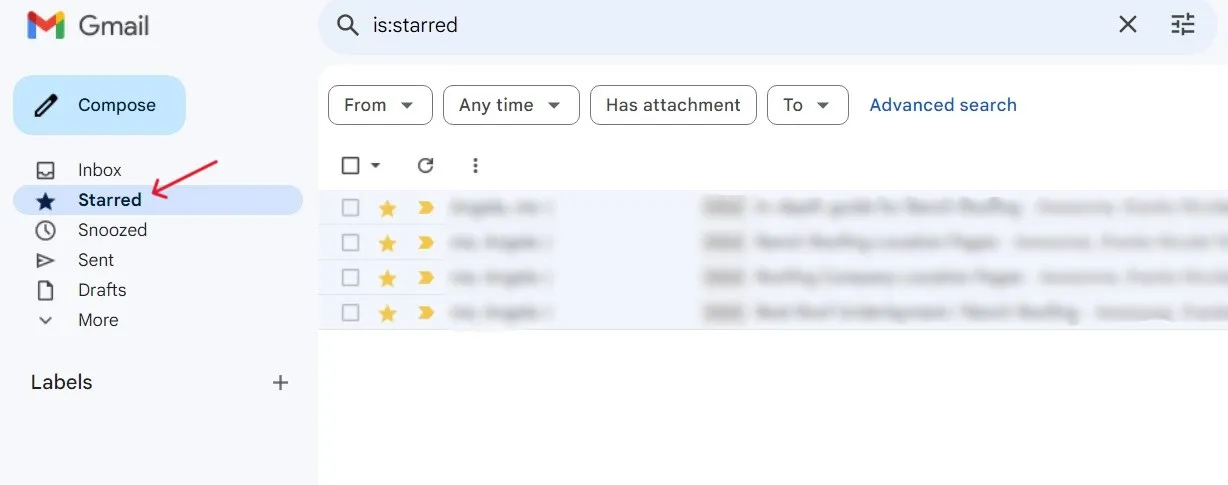
Starred emails
15. Take advantage of the snooze option

Take advantage of the snooze option
Temporarily suppress certain emails until a future date or time. Snoozing an email hides it until your set time, then it pops up again in your inbox to remind you. Hover over your chosen email and click on the 'Snooze' icon, depicted as a clock, and set your time.
Final Thoughts
You will love the improved replying experience we rolled out recently!
1. Improved drag and drop for images and other files.
2. New options for formatting code blocks.
3. Alignment toolbar for images dropped in text.
4. More reliable drafts feature.Thanks to @ckeditor for v5! pic.twitter.com/jzIrd5fvbZ
— SupportBee (@supportbee) September 9, 2024
Organizing your Gmail inbox can effectively improve your productivity, whether your email is for work or recreation. Email is a necessary form of communication. However, if your emails just get lost in the shuffle, it's not a very successful way to communicate.
Keeping your inbox clutter-free and flowing smoothly can help reduce any stress you may feel from an overloaded inbox. SupportBee’s shared inbox provides you with a collaborative email interface where you can chat with members of your team about specific emails. With SupportBee, you can assign emails to teams or team members to efficiently organize your inbox so emails are seen and dealt with in a timely fashion.
Frequently Asked Questions
How do you declutter your Gmail inbox?
Regularly clean out your emails to help keep it decluttered. Utilize organizational tips and stay on top of deleting unwanted or unnecessary emails.
How do I maximize my Gmail inbox?
Maximize your Gmail inbox by taking advantage of the many settings in Gmail. For instance:
- Customize your layout
- Prioritize important emails
- Use labels and categories
- Install a shared inbox
- Enable notifications
- Archive older emails
How do I bulk clean up my Gmail inbox?
To do a bulk cleaning, filter your emails to sort the ones you want to delete. Once you have your list, click the top box to check them all off. Then click the 'Trash' icon, depicted as a trash barrel, and delete.
How do I clean up my Gmail storage?
To free up storage space in Gmail, bulk delete any unwanted emails. Then go to your 'Trash' folder and click the top box to bulk choose the entire list. Click 'Delete forever.'